
How To Put Line On A Fishing Rod involves threading the line through the guides and securing it properly. This ensures smooth casting and reeling, which is crucial for a successful fishing experience.
When you’re out on the water, having your line set up correctly can make all the difference. A well-prepared rod helps prevent tangles and enhances your overall fishing performance.
Choosing the right fishing line is crucial for a successful day on the water. With various types of lines available, understanding their differences can significantly improve your fishing experience.

Choosing the Right Fishing Line
When you’re gearing up to put line on a fishing rod, you’ll want to know about the three main types: monofilament, braided, and fluorocarbon. Each type has its unique benefits and is suited to different fishing situations.
Monofilament line is the most common and is great for beginners. It’s flexible, easy to handle, and floats, making it ideal for topwater lures. However, it can stretch, which might not be ideal when you’re trying to set the hook with precision.
Braided line, on the other hand, is known for its strength and sensitivity. It has little to no stretch, allowing for better hook sets and more control over your bait. It’s perfect for fishing in heavy cover or deeper waters, but be aware that its visibility might scare off some fish.
Fluorocarbon line is a good middle ground. It’s nearly invisible underwater, making it great for clear waters or when fish are skittish. It sinks, which can be beneficial for certain techniques but can also make it less versatile than monofilament.
Line Weight Considerations
When choosing a line, you’ll also need to consider line weight. This is usually measured in pounds and should match your fishing rod’s specifications. For example, if you’ve got a rod rated for 10-20 lb test, using a line in that range will give you the best performance.
Matching the line type to your rod is essential, too. If you’re using a lightweight rod, a heavier braided line may not be compatible. Conversely, if you’re using a heavy rod, a light monofilament might not provide the strength you need to land larger fish.
As a practical tip, always check the line capacity of your reel before adding new line. This ensures you don’t overfill it, which can lead to tangles and poor casting. A good rule of thumb is to leave a little space at the top of the spool for optimal performance.
Before you dive into the exciting process of adding line to your fishing rod, it’s crucial to prepare your rod properly. Taking a few moments to inspect and clean your gear can save you a lot of headaches later on.
Preparing Your Fishing Rod
Getting your fishing rod ready involves a few simple but essential steps. You’ll want to check the rod guides, clean the reel, and gather the necessary tools to make the process seamless.
First, let’s start with inspecting the rod guides. These are the small rings that help guide the fishing line along the length of your rod. Look for any cracks, bends, or debris that might catch the line and cause it to fray. If you spot any issues, consider replacing the guide before moving on.
Next up, it’s time to clean your reel. A clean reel not only performs better but also extends its lifespan. Use a soft cloth to wipe down the outside, and don’t forget to check inside for any dirt or sand that may have accumulated. A little maintenance goes a long way!
Now, gather all the tools you’ll need. You’ll typically want a pair of scissors, a line spool, and possibly a line cutter. Having everything within reach makes the process smoother. Imagine trying to add line only to realize your scissors are nowhere to be found!
Here’s a practical tip: if you’re unsure about the condition of your guides or reel, a quick online tutorial can help you identify issues you might not notice at first glance. Keeping your gear in top shape means you’ll spend less time troubleshooting and more time fishing!
Spooling line onto your reel properly is crucial for a successful fishing trip. A well-spooled line can prevent tangles and help you cast further, making your time on the water more enjoyable.
Spooling the Line onto the Reel
This process involves a few key steps that ensure your line performs at its best. Getting it right means you can focus on catching fish instead of dealing with frustrating line issues.
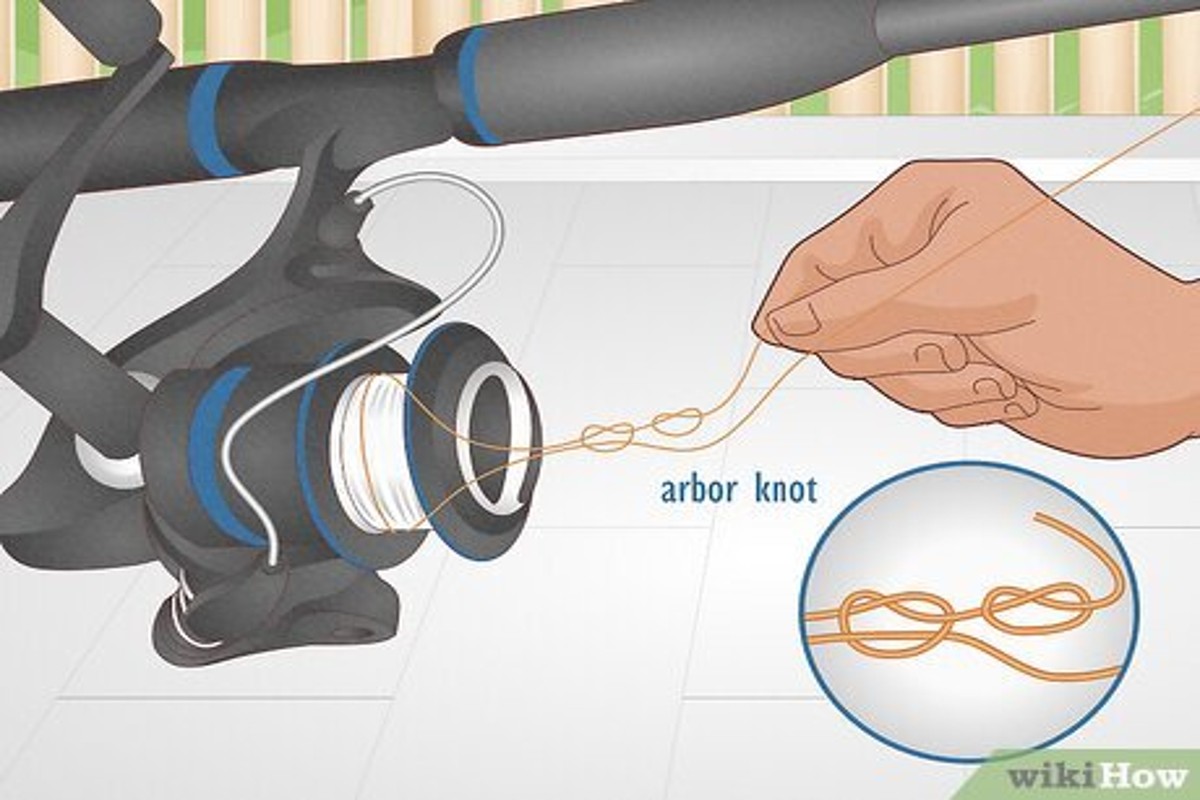
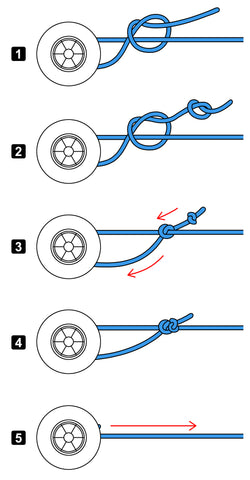
First, you’ll need to attach the line to the reel spool. Start by threading the end of the line through the small opening on the spool. Tie a simple knot, like an Arbor knot, to secure it. Make sure it’s tight; you don’t want the line slipping off when you’re reeling in that big catch!
Next, maintaining tension while spooling is vital. As you wind the line onto the reel, use your other hand to hold the line taut. This tension helps prevent loose coils that can lead to tangles later on. If you’re spooling with a friend, have them hold the spool while you reel it in; it makes the process smoother.
A common mistake is allowing the line to twist while spooling. To avoid this, make sure the line is coming off the spool in the correct direction. If you’re using a spinning reel, the label on the line should face you as you’re reeling it in. If it’s coming off the opposite way, you’ll end up with a mess of twists that can ruin your fishing experience.
For example, imagine you’re out on a bright Saturday morning, finally ready to try out that new lure. You’ve got everything set, but when you cast, your line tangles, and you lose precious time. Preventing twists during spooling can save you from these headaches.
As a practical tip, consider spooling your line with a bit of backing if you’re using a lighter line on a larger reel. This can help fill the spool and improve your reel’s performance, making it easier to cast and retrieve. With these steps, you’ll have a well-spooled line that’s ready for action!
Now that you’ve spooled your reel, it’s time to thread the line through the rod’s guides. This step is crucial for ensuring that the line flows smoothly as you cast and retrieve your bait. Let’s break down the process.
Threading the Line Through the Guides
Threading the line might seem daunting, but it’s quite straightforward. You’ll start at the reel and work your way up through each guide, finishing at the tip of the rod.
First, take the end of your line and pull it from the reel. You’ll want to guide it through the first guide closest to the reel. Make sure you’re following the correct path through each guide as you go. This path is typically from the bottom of the guide to the top, which helps keep the line secure and prevents tangling.
As you move along the rod, keep the line taut but not overly tight. This helps ensure that the line sits properly in the guides without any slack. If you’re using a spinning rod, the line should come off the reel in the same direction as the first guide to avoid twists.
Once you reach the last guide at the tip of the rod, you need to secure the line. Thread it through the tip guide, ensuring it’s snug. A great way to check is to give it a gentle tug—if it holds firm, you’re good to go!
Imagine you’re out on the water, casting your line for the first time. You want everything to work smoothly, and that starts with the threading. Properly threaded guides mean fewer hassles when you’re trying to reel in that big catch.
Always double-check your work. If you see any twists or kinks while threading, take a moment to fix them. A little care at this stage goes a long way in enhancing your fishing experience.
Getting the line secured to your hooks or lures is crucial for a successful fishing trip. The right knot can make all the difference in your catch rate, so let’s dive into some essential knots you need to know.
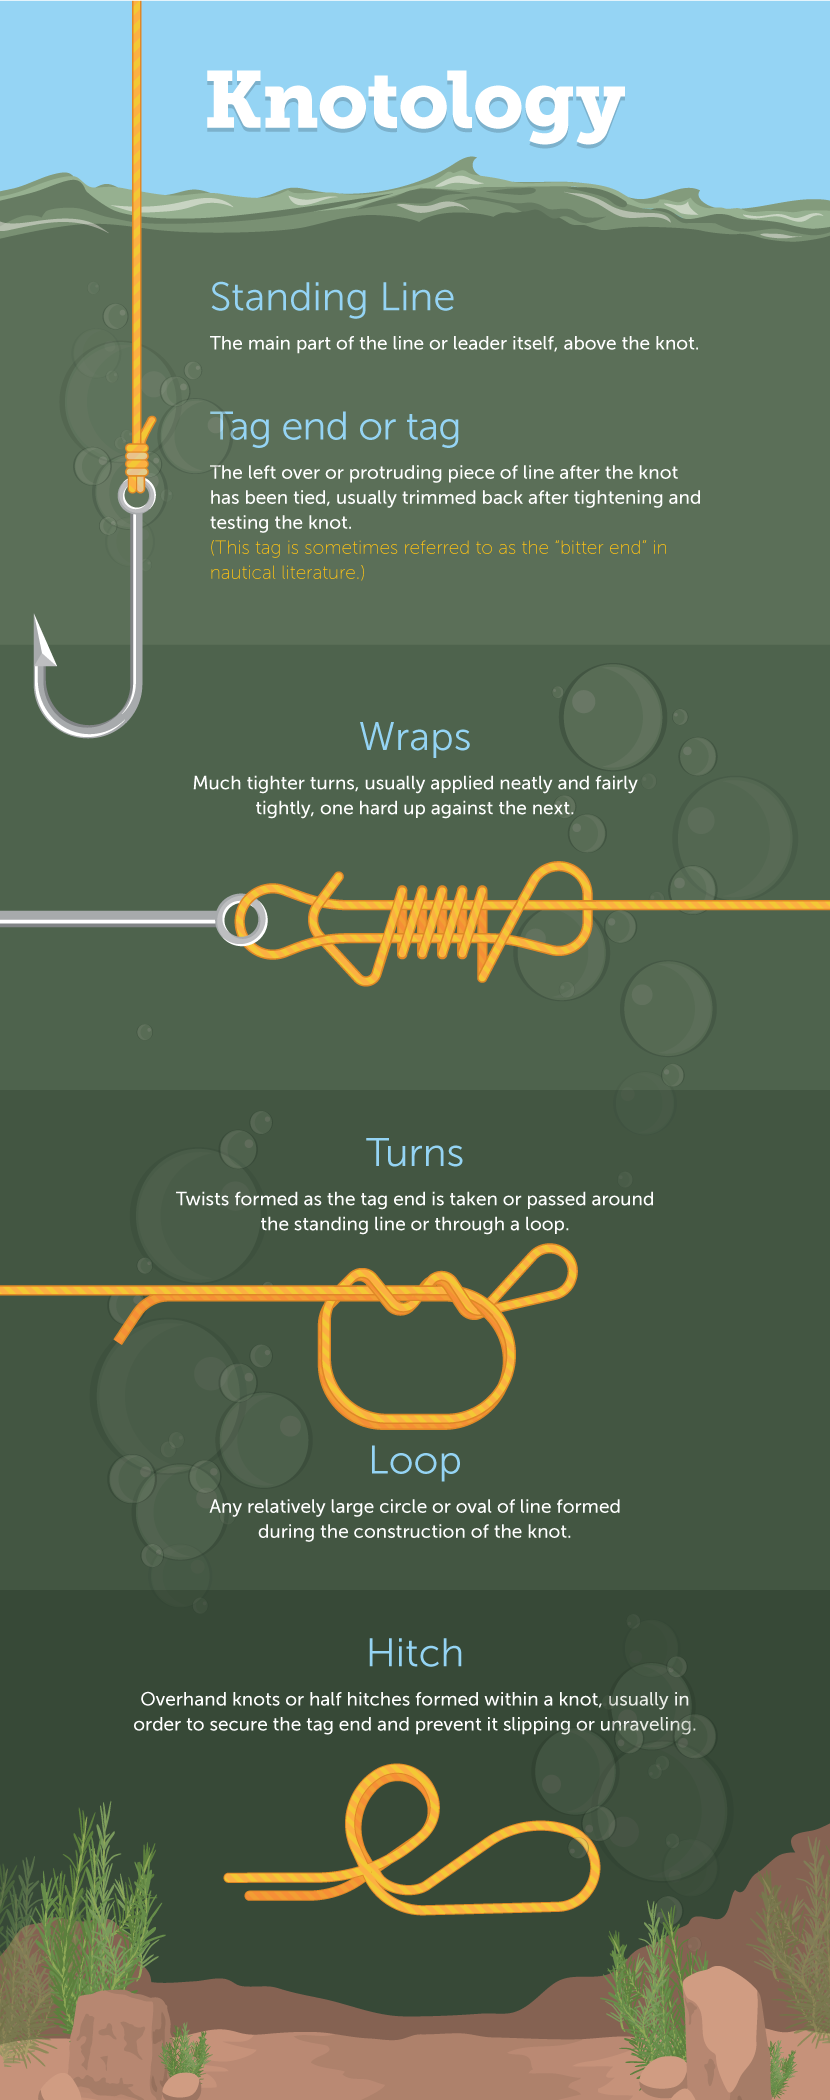
Tying Knots for Secure Connection
Using the right knot to connect your line to hooks or lures can enhance your fishing experience. A strong knot helps to ensure that your catch doesn’t slip away at the last moment.
One of the most reliable knots you can use is the improved clinch knot. This knot is easy to tie and provides a strong hold on your hook. To tie it, thread the line through the eye of the hook, wrap it around the standing line five to seven times, then loop it back through the hole near the eye. Finally, moisten the knot and pull tight. It’s perfect for most fishing situations!
Another popular option is the Palomar knot. This knot is known for its strength and simplicity. Just double your line, pass it through the hook’s eye, tie an overhand knot, and then pull the loop down over the hook. It’s a great choice for braided lines and can handle the pressure without slipping.
When choosing a knot, consider the type of tackle you’re using. For instance, if you’re fishing with light tackle, the improved clinch knot may be ideal. But if you’re using heavier lines or targeting larger fish, the Palomar knot could be your best bet. Each knot has its strengths, so it’s good to have a few in your back pocket.
Imagine you’re out on the lake, excited to catch that elusive bass. You tie on your lure with the improved clinch knot but then realize you’re using a braided line instead. Switching to the Palomar knot can give you the confidence that your connection will hold when that big fish bites.
Experimenting with different knots can be fun and rewarding. Don’t hesitate to practice a few times at home before you hit the water. A little preparation goes a long way in ensuring a successful fishing trip!
Once you’ve spooled your fishing line onto your rod, it’s crucial to ensure everything is in top shape before heading out. A few final checks can make all the difference in your fishing experience.
Final Checks and Maintenance Tips
Taking the time for these checks and maintenance practices will help you avoid any surprises once you’re on the water. Let’s dive into what you should look out for.
First up, checking for line twists. This is a common issue that can affect your casting distance and accuracy. To check for twists, simply let your line out while reeling in slowly. If you notice the line coiling or twisting, it’s time to correct it. You may need to re-spool your line or change the way you’re casting.
Next, assess your line’s strength and integrity. Fishing line can weaken over time due to UV exposure, abrasions, or just plain wear and tear. Give it a good visual inspection. If you see any frays or discoloration, consider replacing that section or the entire line. A good practice is to test the line’s strength by pulling it firmly. If it feels weak or breaks easily, it’s definitely time for a change.
Regular Maintenance Practices
Regular maintenance can extend the life of your fishing line. After each fishing trip, rinse your line with fresh water to remove any salt, dirt, or debris. This simple step helps prevent corrosion and keeps your line smooth.
- Check your line every few trips for signs of wear.
- Store your fishing rod in a cool, dry place to avoid UV damage.
- Consider using line conditioner to maintain elasticity and strength.
Before you head out, remember that a little effort goes a long way. Regular checks and maintenance ensure that when you do learn how to put line on a fishing rod, you’re ready for whatever the day brings. Happy fishing!