

How To Re Line A Fishing Rod involves replacing the fishing line on your rod to ensure better casting and catch rates. This process is essential for maintaining your fishing gear.
Regularly re-lining your fishing rod can enhance your fishing experience, making it easier to catch fish and improve your accuracy. Whether you’re a weekend angler or a seasoned pro, knowing how to do this can save you time and improve your success on the water.
When you’re getting ready to re-line your fishing rod, understanding the different types of fishing lines is crucial. Each type has its own unique characteristics that can affect your fishing experience.
Understanding Fishing Line Types
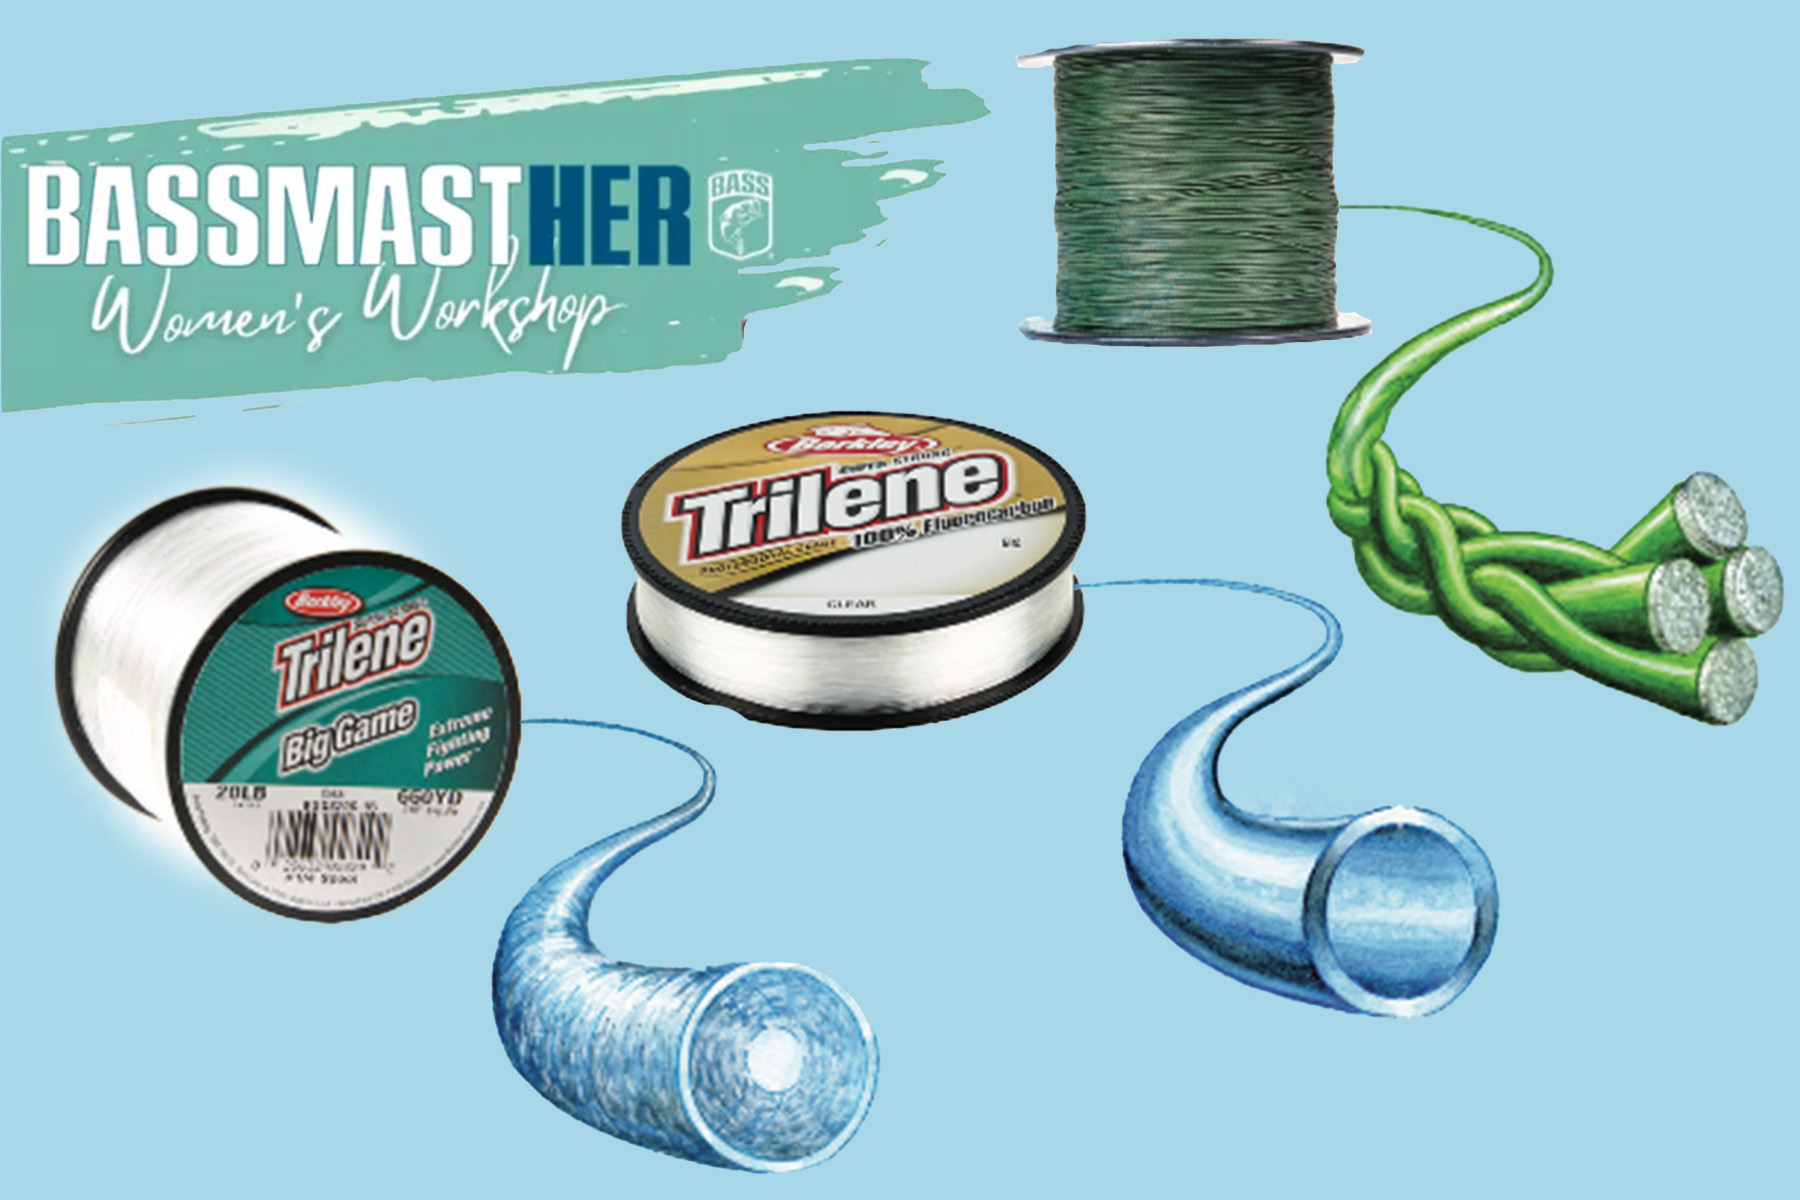
There are three main types of fishing line: monofilament, braided, and fluorocarbon. Each has its own strengths and weaknesses, making them suitable for different fishing situations and techniques.
Monofilament Line Characteristics: Monofilament line is made from a single strand of material, making it flexible and easy to handle. It’s great for beginners because it’s forgiving and has a certain amount of stretch, which can help absorb the shock when a fish strikes. However, it can be more prone to tangles and can degrade in sunlight over time.
Braided Line Advantages: Braided line consists of multiple strands woven together, giving it incredible strength and sensitivity. This means you can use a thinner line without sacrificing power. It’s less likely to stretch, which makes it easier to feel bites. However, braided lines can be a bit more visible in the water, so you might want to use a leader line with it.
Fluorocarbon Line Benefits: Fluorocarbon line is nearly invisible underwater, making it an excellent choice for clear water fishing. It also sinks faster than monofilament, which can help get your bait down to the fish more quickly. While it can be stiffer and harder to handle, its abrasion resistance makes it a great option for fishing around rocks and other obstacles.
When choosing a fishing line, consider the type of fishing you’ll be doing. Each line has its place, and knowing how to select the right one will improve your chances of landing that big catch. For example, if you’re fishing in a clear lake for trout, fluorocarbon might be your best bet. But if you’re reeling in bass in a weedy area, braided line could give you the edge you need.
When you’re ready to reline your fishing rod, having the right tools on hand makes the process smooth and efficient. Let’s dive into what you’ll need to get started.

Tools Needed for Relining
Relying on the correct tools can make relining your fishing rod a breeze. Here’s a quick rundown of the essential items you’ll need to ensure a successful job.
New Fishing Line: The most crucial item is, of course, the new fishing line. Choose a line that suits your fishing style and the species you’re targeting. Whether it’s monofilament, fluorocarbon, or braided line, make sure it fits your reel and rod setup.
Line Cutter: A sharp line cutter is a must-have to make clean cuts without fraying the line. Scissors work, but a dedicated line cutter is quicker and often more efficient. You’ll appreciate how easy it is to snip off old line and trim the new line as you re-spool.
Spooler/Reel: Lastly, a spooler or reel will help you reel in the new line evenly. If you don’t have a spooler, you can use your hands, but it might take longer and could lead to uneven winding. A good reel will help you maintain tension and prevent tangling.
Before you start relining, make sure you have everything organized. Having your new line, cutter, and spooler nearby will save you time and frustration. You’ll be back on the water in no time, ready to reel in that big catch!
Removing the old line from your fishing rod is the first step in the process of re-lining. It’s easier than it sounds and ensures your new line performs at its best.

Steps to Remove Old Line
Before you can re-line your fishing rod, you need to completely remove the existing line. This not only helps you avoid tangles but also gives you a chance to check the condition of your reel and guides.
Start by unspooling the old line. Hold the rod securely and slowly pull the line off the reel. If it’s tangled, take your time to untangle it instead of yanking it off. You might consider using a pair of scissors to cut the line if it’s too knotted.
As you’re unspooling, take a moment to inspect the reel. Check for any signs of wear or damage, like cracks or missing parts. If the reel isn’t functioning smoothly, it might be time for a repair or replacement. A smooth reel is crucial for your fishing success.
Cleaning the Guides
Once the line is off, don’t forget to clean the guides. These are the little rings along your rod that the line passes through. Use a soft cloth or a cotton swab dipped in water to wipe them down. This step can help prevent future line snags and keep your casting smooth.
A practical tip: if you’re out on the water and your line breaks, you can always bring a small pair of scissors with you. That way, you can quickly cut away any damaged line and get back to fishing without hassle. Remember, knowing how to re-line a fishing rod can save you time and frustration!
Spooling new line onto your fishing reel is a crucial step in the process of re-lining your rod. Doing it correctly can enhance your overall fishing experience and improve your catch rate.
How to Spool New Line
Learning how to spool new line effectively ensures that you avoid common issues like tangles and twists. With a little practice, you’ll be able to do this quickly and easily, so you can get back to fishing.
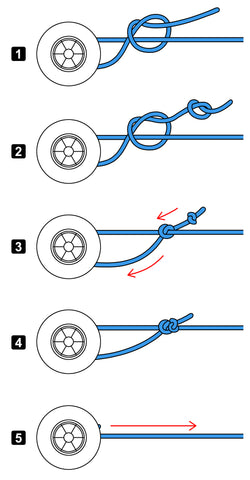
First, start by attaching the new line to the spool. Take the end of the line and thread it through the eyelet on the reel, then tie a secure knot. A good choice is the Arbor knot, as it’s simple and effective. Trim any excess line after tying.
Next, you need to maintain proper tension while spooling. This is key to preventing loops and twists in your line. Hold the line between your fingers as you reel it in, applying gentle pressure. This helps the line lay evenly on the spool.
One common issue anglers face is line twist. To prevent this, make sure that the line is coming off the spool in the correct direction. If you’re using a spinning reel, the line should come off the top of the spool. You can also periodically pause to let the line hang freely, which can further reduce twisting.
Imagine you’re out on the water, and you can’t seem to cast without getting tangled. That’s frustrating! By spooling your line correctly, you can avoid those annoying situations and enjoy a more productive day fishing.
Finally, always check the line’s condition and replace it regularly. A well-spooled line can significantly improve your fishing game. Happy fishing!
When it comes to re-lining your fishing rod, knowing how to tie the right knots is crucial. The knots you choose can make a significant difference in your fishing success. Let’s dive into some of the best knots for attaching line to lures or hooks.
Tying Knots for Line Connection
Using the right knots not only secures your lures and hooks but also helps you avoid losing that big catch. Here are three of the top knots you should consider when re-lining your fishing rod.
The improved clinch knot is a classic choice for many anglers. It’s easy to tie and works well with various types of fishing line. The knot provides a strong hold, ensuring that your lure stays attached, even when you’re reeling in a hefty fish.
Next up is the Palomar knot, which is known for its strength and simplicity. It’s particularly effective with braided lines, making it a favorite among many fishermen. To tie this knot, you just double the line, pass it through the hook’s eye, tie an overhand knot, and then pass the hook through the loop. It’s that simple!
Lastly, the loop knot is an excellent option if you want your lure to move freely in the water. This knot creates a fixed loop that lets your lure swim naturally. It’s perfect for topwater lures and can attract more fish. Just remember, a well-tied loop knot can make all the difference.
When you’re out on the water, take a moment to practice these knots. It’ll pay off when you find yourself battling a big fish. Trust me, a secure knot can mean the difference between a trophy catch and a lost trophy.
After you’ve successfully re-lined your fishing rod, it’s crucial to test everything before heading out to the water. A quick setup check can save you from a frustrating day of fishing.

Testing Your Setup
Testing your setup ensures that everything is functioning smoothly. This step helps you catch any potential issues before they become a problem on your fishing trip.
Start by checking for smoothness. Run your fingers along the line to see if it glides freely through the guides. A snag or rough patch can lead to tangles or even breakage when you cast.
Next, practice some casting. Head to an open area and make a few test casts. This will not only help you get a feel for the new line but also let you gauge the distance and accuracy. For example, if you’re targeting a specific spot on the water, you’ll want to make sure your cast can reach it without any hitches.
Lastly, inspect the line for defects. Look for any frays or knots that could compromise your catch. A quick visual check can save you a lot of hassle later. If you notice anything unusual, consider re-spooling the line again.
Before you head out, remember that a well-tested rig is your best friend on the water. You wouldn’t want to miss out on that big catch because of an overlooked detail. Happy fishing!