
How To Tie A Hook To A Fishing Rod involves a few simple steps using different knots. This process ensures your hook is secure for effective fishing, which is essential for catching fish successfully.
Whether you’re a beginner or an experienced angler, knowing how to tie a hook correctly can make a big difference. A well-tied hook increases your chances of landing that big catch and enhances your overall fishing experience.
Choosing the right knot is crucial for tying a hook to your fishing rod. The knot you select can impact your fishing success and the overall durability of your setup.

Choosing the Right Knot for Your Hook
There are several types of knots you can use for tying hooks, but two of the most popular are the Palomar knot and the Improved Clinch knot. Each has its own strengths and specific situations where it shines.
The Palomar knot is a favorite among anglers for its simplicity and strength. It’s perfect for tying hooks to braided lines, which can be tricky with other knots. You’ll want to use it when you’re fishing in heavy cover or targeting larger fish, as it holds tight under pressure.
On the other hand, the Improved Clinch knot is a classic choice that works well with monofilament lines. It’s especially useful when you need a secure hold with smaller hooks or lighter tackle. If you’re fishing for species like trout or panfish, this knot is your go-to for its reliability.
Advantages of Different Knots
- Palomar Knot: Offers high strength and is easy to tie, making it ideal for beginners.
- Improved Clinch Knot: Provides a secure hold and is versatile for various fishing scenarios.
Imagine you’re out on the lake, and you hook into a big bass. If you’ve tied your hook with a Palomar knot, you can feel confident that your line won’t slip or break under pressure. This knot’s strength is a game-changer when you’re up against a fish that’s putting up a fight.
Next time you’re prepping for your fishing trip, consider which knot fits your situation best. Knowing how to tie a hook to a fishing rod using the right knot can make all the difference in your fishing experience.
Before you dive into tying a hook, it’s essential to gather the right tools and materials. Having everything at your fingertips makes the process smoother and more enjoyable.
Gathering Required Tools and Materials
When you’re ready to tie a hook, you’ll need a few basic items. These include fishing line, the right hook for your target fish, and some handy tools to make the task easier.
First off, let’s talk about the fishing line. You’ll want a line that’s suitable for the type of fishing you’re doing. For example, monofilament is great for beginners because it’s easy to handle and knots well. If you’re going for bigger fish, you might opt for braided line, which offers more strength and sensitivity.
Next, choosing the right hook is crucial. Hooks come in various sizes and shapes, designed for different species. For instance, if you’re fishing for trout, a smaller hook like a #10 or #12 works well. On the other hand, if you’re after bass, you’ll want something larger, like a #2 or #4. Matching the hook size to your bait and target fish increases your chances of success.
Now, let’s get into the tools. A pair of scissors is invaluable for cutting your fishing line to the desired length. You’ll also want a set of pliers, which can help you tighten knots or remove hooks from fish safely. If you’ve ever struggled with a stubborn knot or a slippery fish, you know how handy these tools can be!
As you prepare, consider setting up a small workspace. Having everything organized will make it easier when you start learning how to tie a hook to a fishing rod. Plus, you won’t waste time searching for tools or materials while you’re excited to start fishing.
Tying a hook to a fishing rod might seem tricky at first, but with a little practice, you’ll master it in no time. This guide will walk you through the steps to get it right, ensuring your hook is secure and ready for your next big catch.

Step-by-Step Guide to Tying a Hook
Follow these simple steps to tie a hook to your fishing rod. Each step is designed to be easy to understand, so you can get back to fishing without any hassle.
Step 1: Threading the Line
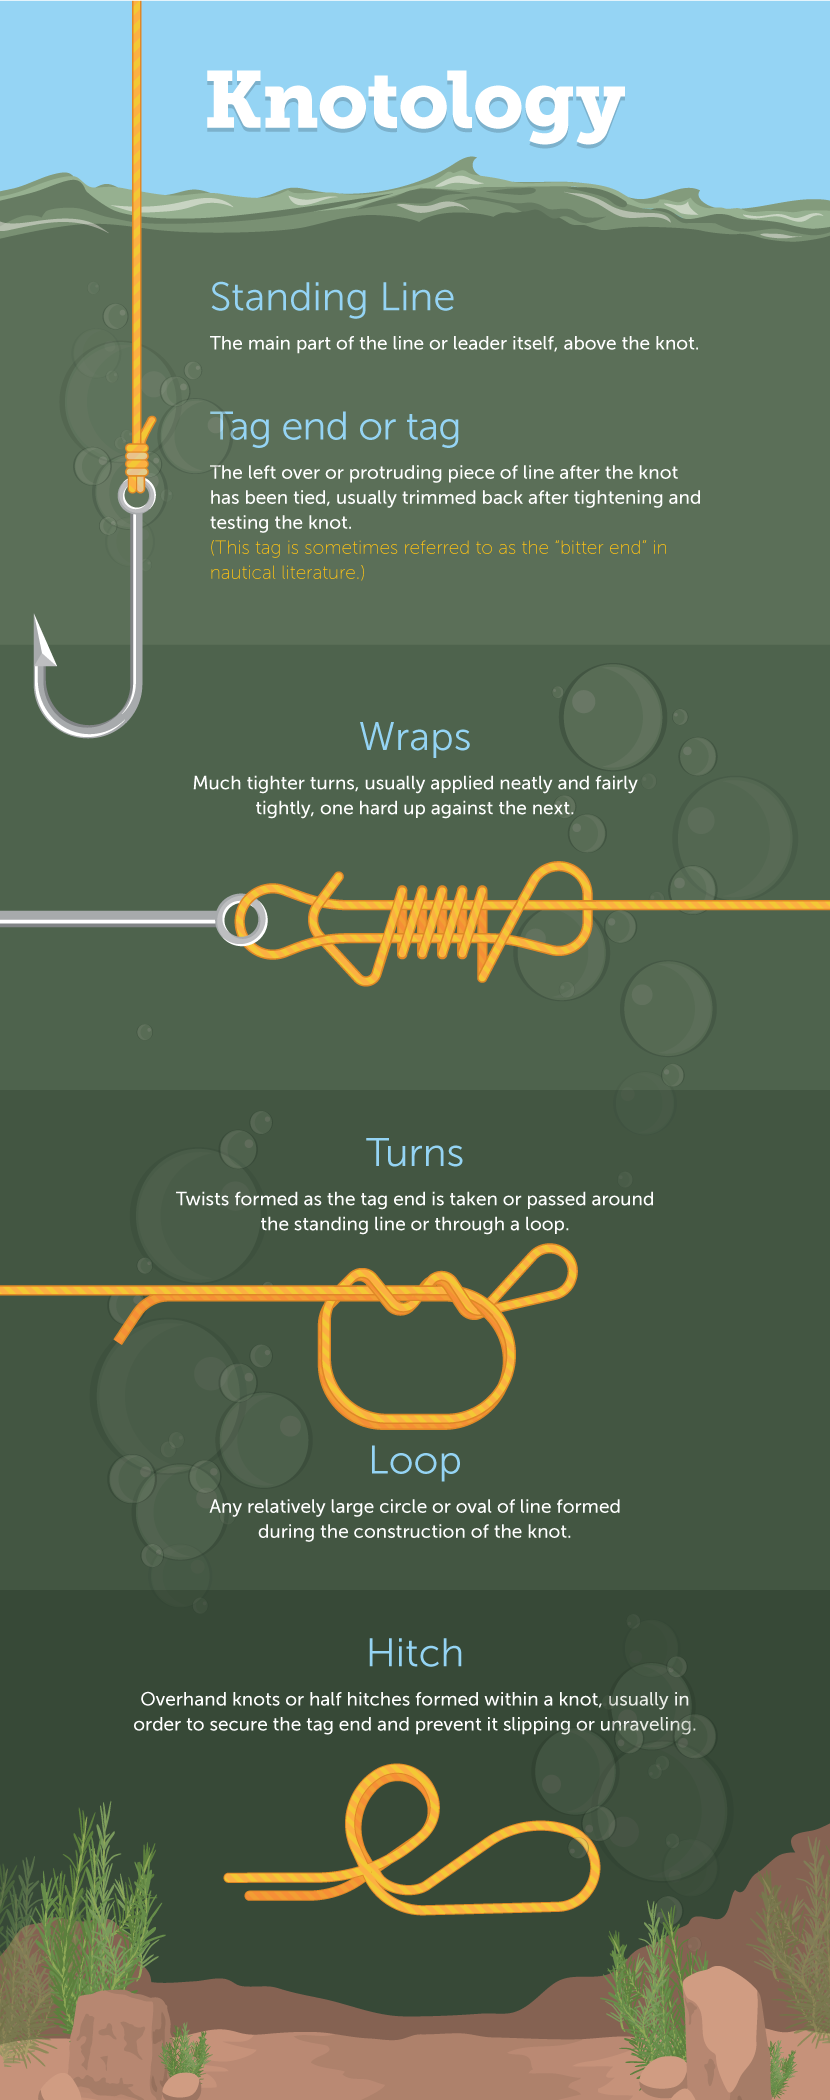
Start by taking your fishing line and threading it through the eye of the hook. Make sure to leave a long end to work with. Typically, a few inches should do the trick. This part is crucial for creating a strong knot later.
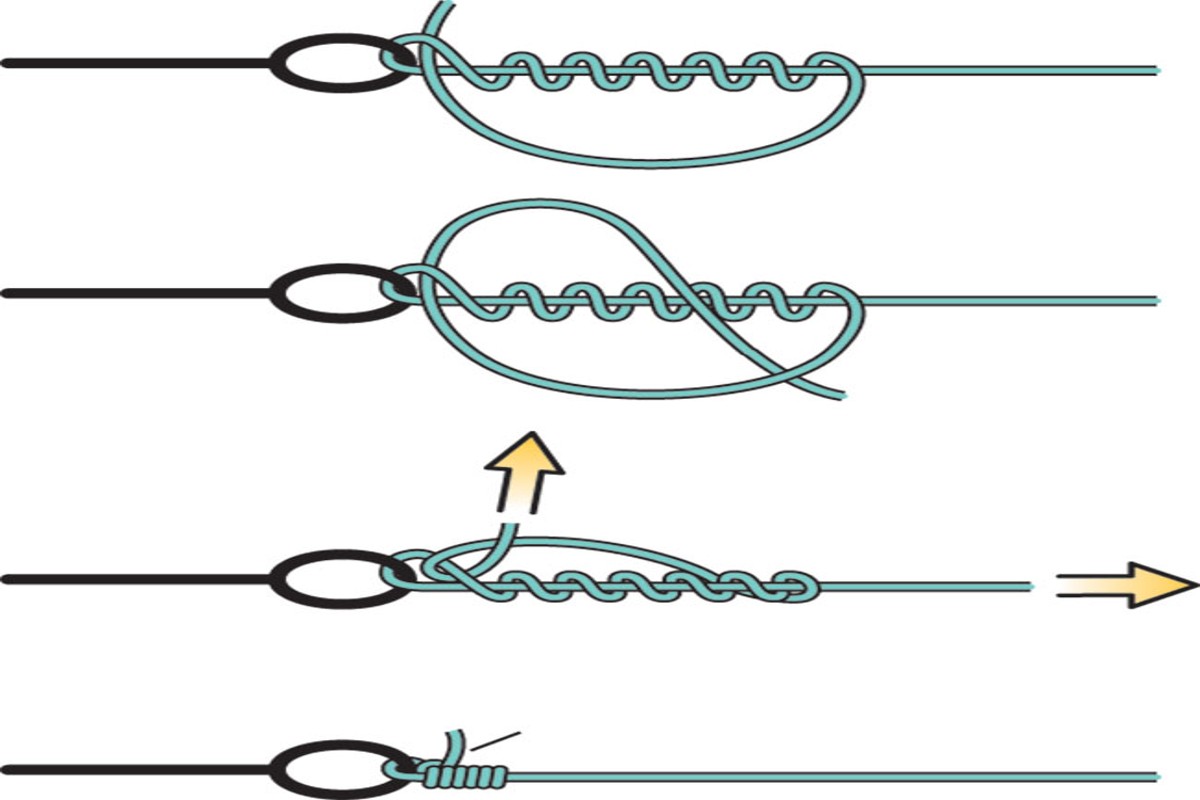
Step 2: Making the Knot
Once the line is threaded through the hook, it’s time to create a knot. Hold the hook and the standing line together. Then, wrap the tag end of the line around the standing line and the hook shank about six times. The more wraps you make, the stronger the knot will be. After that, take the tag end and thread it back through the loop near the eye of the hook. This creates a secure knot that will hold under pressure.
Step 3: Securing the Hook
Now that you’ve made your knot, pull both the standing line and the tag end to tighten everything. Make sure the knot slides down snugly against the hook. Trim any excess line if needed, but don’t cut it too close. You want to leave a little length to prevent it from slipping.
Picture this: you’re out on the lake, the sun is shining, and after a few casts, you finally feel a tug on your line. Knowing you tied your hook securely gives you the confidence to reel in that catch. The satisfaction is unbeatable!
Remember, practice makes perfect. The more you tie hooks to your fishing rod, the more natural it will feel. Soon enough, you’ll be tying hooks like a pro without even thinking about it.
When you’re gearing up for a fishing trip, tying the perfect hook is crucial. However, even experienced anglers can make mistakes that cost them the catch of the day. Let’s dive into some common pitfalls and how to avoid them.
Common Mistakes to Avoid When Tying Hooks
Whether you’re a beginner or a seasoned pro, knowing what not to do can save you time and frustration. Here are some frequent errors to keep in mind when learning how to tie a hook to a fishing rod.
One common mistake is over-tightening knots. While you want your knot to be secure, cranking it too tight can actually weaken the line. This can lead to breakage when you least expect it, especially when you hook a big fish. Instead of reefing it down, aim for a snug fit that still allows for a bit of give.
Using the wrong knot for your hook is another frequent error. Different knots serve different purposes, and using one that isn’t suited for your hook type can lead to failure. For instance, if you’re using a small treble hook, a simple overhand knot won’t cut it. Opt for a knot like the Palomar or the Improved Clinch that’s designed to handle the specific hook style.
Finally, don’t forget to check your line strength. If you’re using a weak line, even the best knot won’t save you when it’s time to reel in. Before you tie anything, make sure your fishing line is appropriate for the size of the fish you’re targeting. A good rule of thumb is to choose a line that’s at least 20% stronger than the weight of the fish.
Next time you’re about to tie a hook, take a moment to consider these common mistakes. By being mindful of them, you’ll increase your chances of landing that big catch. A little knowledge goes a long way in enjoying a successful fishing experience!
Before you hit the water, you want to make sure your knot is secure. A slip can result in lost gear or missed catches, so it’s wise to double-check your work.
Testing Your Knot: Best Practices
Ensuring your knot is tight and secure can save you a lot of frustration when fishing. A few simple tests can confirm that your knot is ready for action.
Start with a visual check. Look closely at your knot and the line. Are the coils snug and neat? Any loose ends or fraying can signal a problem. If something looks off, it’s better to re-tie your knot now than to lose a fish later.
Next, you’ll want to test line tension. Hold your rod firmly and give the line a gentle tug. If your knot holds up under pressure, you’re in good shape. If it slips or feels loose, don’t hesitate to re-tie the knot. It’s better to be safe than sorry!
Let’s say you’re on the lake, and you just tied your hook following the steps on How To Tie A Hook To A Fishing Rod. You give the line a quick pull, and it feels solid. But then, you notice the knot looks a bit off. A quick re-tie takes just a minute, but it could mean the difference between reeling in a big catch or watching it swim away.
Lastly, don’t forget to re-tie if you’re switching lures or if your line has been through a tough battle with the fish. Even a good knot can weaken after a few catches, so it’s smart to refresh it regularly.
Before you cast your line, take these steps to ensure your knot is rock solid. A little effort now means a more enjoyable day on the water later.
Tying a hook to your fishing rod doesn’t have to be intimidating. With a bit of practice and the right resources, you can master this essential skill in no time. Here are some practical tips to help you enhance your knot-tying skills as a beginner.
Tips for Beginners: Enhancing Your Tying Skills
Improving your knot-tying skills can make a huge difference in your fishing success. By dedicating some time to practice and utilizing available resources, you’ll feel more confident on the water.
First, practice with different types of fishing lines. Each line has its own characteristics, and familiarizing yourself with them will help you understand how they react to various knots. You might find that some lines are more forgiving, while others require a bit more finesse. For instance, monofilament lines are generally easier to work with compared to braided lines, which can be slippery.
Next, don’t underestimate the power of visual learning. Watching tutorial videos can be incredibly effective. YouTube is filled with talented anglers who demonstrate various knot-tying techniques. By following along, you can see the steps in action, making it easier to replicate them. Choose a few videos that resonate with you and practice the knots they showcase.
Another excellent way to enhance your skills is by joining fishing workshops. These hands-on experiences allow you to learn from seasoned anglers and receive immediate feedback. Being in a group can also motivate you to practice more. Imagine being in a workshop where everyone is tying knots together, sharing tips, and troubleshooting each other’s techniques. It’s a great way to build confidence.
As you practice, keep a journal of the knots you learn and the results you achieve. This can help track your progress, highlight what works best for you, and what doesn’t. You might find that certain knots are better for specific fishing conditions. For example, the Palomar knot is excellent for securing hooks, while the improved clinch knot is great for tying on lures.
Remember, practice makes perfect. The more you tie knots and experiment with different lines, the more comfortable you’ll become. Before you know it, you’ll be tying hooks like a pro, ready to tackle any fishing adventure that comes your way!