
How To Put String On A Fishing Rod involves threading the fishing line through the guides and securing it properly. This process ensures optimal performance while fishing.
Properly stringing your fishing rod can enhance your experience on the water. Whether you’re a beginner or a seasoned angler, knowing how to do this correctly can make a significant difference in casting and catching fish.
Choosing the right fishing line can make a big difference in your fishing experience. With various options available, it’s essential to understand what works best for your needs.

Choosing the Right Fishing Line
When selecting a fishing line, you’ll typically choose between monofilament and braided line. Each type has its advantages and is suited for different fishing conditions and techniques.
Monofilament line is a popular choice for beginners. It’s stretchy, which helps absorb shocks when you hook a fish. Plus, it’s usually easier to handle and tie knots with. On the other hand, braided line is known for its strength and sensitivity. It has a smaller diameter than monofilament, allowing you to spool more line onto your reel. If you’re targeting larger fish or fishing in heavy cover, braided line might be the way to go.
Line Weight Considerations
Line weight is another crucial factor in your decision. This refers to the line’s strength, which is usually measured in pounds. A heavier line is suitable for larger fish, while a lighter line can be more effective for smaller species. If you’re fishing in clear water, lighter lines can be less visible to fish. For example, if you’re going after bass, a 10- to 15-pound test monofilament line might be ideal. But if you’re after catfish, you might want something heavier, like a 20- to 30-pound braided line.
Choosing the Right Length
The length of fishing line you need primarily depends on your reel and fishing style. Most reels can hold anywhere from 150 to 300 yards of line. For typical freshwater fishing, 200 yards is often sufficient. If you’re planning to fish in saltwater or for larger species, consider going for a longer line to accommodate more distance and depth.
A good rule of thumb is to fill your reel to about 1/8 inch below the spool’s rim. This ensures you have enough line without overfilling, which can lead to tangles. Remember, when you’re learning how to put string on a fishing rod, taking the time to pick the right line will set you up for success on the water.
Getting your fishing rod ready for stringing is crucial. You want to make sure everything is in tip-top shape before you start. Let’s dive into how to prepare your fishing rod.
Preparing the Fishing Rod
Before you put string on your fishing rod, it’s essential to inspect it thoroughly and get everything set up correctly. This ensures a smoother experience when you’re out on the water.
Start by inspecting the rod for any damage. Look for cracks, chips, or any signs of wear that could affect its performance. Even a small imperfection can lead to bigger problems later on. If you notice anything off, it might be time to replace that rod.
Next, set the reel properly. Make sure it’s securely attached to the rod and that it’s aligned correctly. An incorrectly mounted reel can cause tangles and frustration when you’re trying to cast. Check that the reel handle turns smoothly and that the drag system functions as it should.
Understanding the rod’s guides is also important. These are the rings through which your fishing line will pass. Make sure they’re clean and free of any debris. If they’re damaged or misaligned, it could lead to line snags or breaks. You don’t want to lose that big catch because of a minor oversight!
As you prepare, picture this: you’re out on the lake, and everything’s going great, but then your line snaps because you skipped a step here. It’s a bummer, right? Taking the time to prep your rod properly pays off when you’re out there enjoying your day.
A good tip is to keep a fishing rod maintenance kit handy. Having tools for quick repairs or adjustments can save you a lot of time and hassle. You’ll thank yourself later when you’re reeling in that trophy fish!
Getting the line threaded through your reel is a crucial step in the fishing process. It sets the stage for a smooth casting experience and helps ensure you don’t lose any catches. Let’s dive into how to do this correctly.

Threading the Line through the Reel
Threading the line through your reel might seem a bit tricky at first, but with a little guidance, you’ll be a pro in no time. Understanding the direction of the reel spool and how to tie off the line are key steps in this process.
First, you’ll want to pay attention to the direction of your reel spool. Most reels have a label indicating whether the spool rotates clockwise or counter-clockwise. This is crucial because you need to thread the line onto the spool in the same direction it spins. If you get this wrong, the line won’t wind properly, and you’ll face tangles or knots.
Next, let’s talk about tying the line to the spool. Start by pulling out a few feet of line from the spool, and then thread it through the small hole in the spool. You should tie a strong knot—like the Arbor knot—to secure it. Make sure the knot is tight and trim any excess line so it doesn’t interfere with your casting.
Now, with the line attached, it’s time to apply proper tension. As you spool the line onto the reel, hold it with your fingers to keep it taut. This tension prevents slack and helps the line lay flat on the spool. If you don’t apply enough tension, you’ll end up with loose coils that can lead to backlashes while casting.
Picture this: you’re out on the lake, ready to cast your line, but your reel is a tangled mess because you didn’t thread it correctly. Frustrating, right? That’s why taking the time to understand how to put string on a fishing rod properly will save you from headaches later on.
When you’re ready to hit the water, double-check that your line is threaded correctly and that it’s tight on the spool. This simple step can make a world of difference in your fishing experience!
Stringing the rod guides is a crucial step in getting your fishing gear ready. If you want to cast smoothly and avoid frustrating tangles, getting this part right is essential.
Stringing the Rod Guides
This process involves threading your fishing line through the guides on your rod. By following the correct order and taking care to avoid twists, you’ll ensure a successful setup.
Start at the bottom guide, which is usually closest to the reel. This is where the line exits the rod and heads toward the water. Pull the line through the first guide, making sure it’s seated properly.
Next, follow the correct guide order. Typically, guides are numbered from the bottom to the tip of the rod. As you thread the line through each guide, work your way up, ensuring you’re keeping the line straight.
While you’re threading, be mindful of line twists. If the line twists around itself, it can cause knots or tangles when you’re fishing. To prevent this, keep a steady tension on the line as you pull it through each guide.
A good tactic is to hold the line between your fingers, so you can feel any twists as you go. If you notice a twist, simply backtrack and straighten it out before continuing.
Imagine you’re on a fishing trip with friends, excited to cast your line. You’ve already set everything up, but if your line isn’t threaded correctly, it can turn a fun day into a frustrating one. Properly stringing your rod guides means fewer issues when it counts.
Remember, taking your time during this step pays off. A well-strung rod will perform better and help you focus on reeling in that big catch instead of dealing with tangled lines.
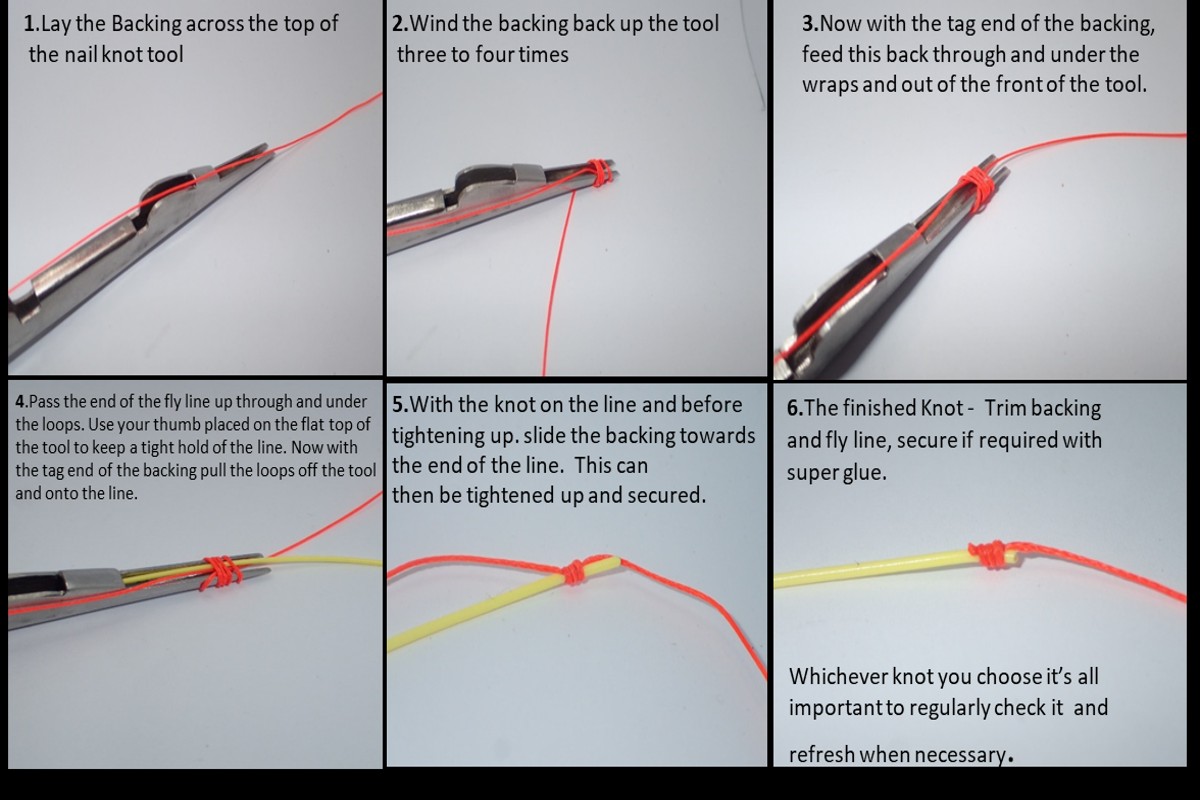
Securing the line on your fishing rod is crucial for a successful day out on the water. If your line slips, you could lose your bait or, worse, a big catch. Here’s how to do it right.
Securing the Line
Once you’ve threaded the line through the guides, it’s time to secure it to the reel. A good knot will keep your line in place and ensure you don’t lose your gear when you hook a fish. Let’s dive into the best methods for securing your line effectively.
Choosing the right knot is essential. There are several types of knots you can use, but some are more reliable than others. For instance, the Palomar knot is a favorite among anglers because it’s easy to tie and incredibly strong. It works well with both monofilament and braided lines.
How to Tie a Strong Knot
To tie a Palomar knot, start by doubling about six inches of line and passing it through the eye of the hook or lure. Next, tie an overhand knot, but don’t tighten it all the way. Then, loop the tag end of the line through the overhand knot and pull it tight. Finally, wet the knot slightly and pull on both ends to secure it firmly.
Testing the line strength after securing is a step you shouldn’t skip. Once you’ve tied your knot, give it a good tug. This ensures that the knot holds and that your line is secure. If it slips or feels weak, don’t hesitate to retie it. You don’t want to risk losing a catch because your knot wasn’t strong enough!
A practical tip: Always keep a pair of scissors handy. If you need to retie or adjust your line, having tools nearby makes the process smoother and quicker. Plus, nothing beats the peace of mind knowing your line is secure when you’re out fishing.
Now that you’ve stringed your fishing rod, it’s time for the final setup and adjustments to make sure you’re ready for a successful day on the water.
Final Setup and Adjustments
These last steps are crucial for ensuring your gear is functioning perfectly. You’ll want to adjust the drag settings, check the line tension, and prepare for your fishing trip so you’re all set to reel in that big catch.
First up, adjusting your drag settings is vital. The drag system controls how much resistance your line has when a fish pulls on it. If the drag is too tight, you might risk breaking your line when a big fish takes the bait. On the flip side, if it’s too loose, the fish can easily escape. Aim for a balance that allows the fish to pull line without snapping it, but still gives you control.
Next, checking your line tension is essential. Too much slack can lead to tangles and missed catches, while too much tension can cause wear and tear on the line. Give your line a gentle pull to ensure it’s taut but not overly tight. A good rule of thumb is to have just enough tension that the line doesn’t droop but isn’t stretched to its limit.
Finally, prepare for your fishing trip by organizing your tackle box. Make sure you have all your lures, hooks, and bait ready to go. Consider the type of fishing you plan to do—whether it’s freshwater or saltwater—so you can pack the appropriate gear. If you’re heading out early in the morning, consider prepping everything the night before to save time.
As a practical tip, try testing your setup before you hit the water. Cast a few lines in your backyard or a nearby park to see how everything feels. This little practice run can help you spot any adjustments needed and ensure you’re ready for a great fishing experience. Remember, knowing how to put string on a fishing rod is just the start; these adjustments are what make the real difference.