
How To Craft Fishing Rod is about creating a custom fishing rod tailored to your needs. It involves selecting the right materials, assembling components, and fine-tuning for optimal performance. This skill enhances your fishing experience and can lead to better catches.
Imagine heading out on a fishing trip with a rod built just for you. By crafting your own fishing rod, you can personalize its length, action, and power, making each cast more enjoyable and effective.
Crafting your own fishing rod can be a rewarding experience, but choosing the right materials is crucial for success. Whether you’re a newbie or a seasoned angler, understanding what goes into your rod will make all the difference.

Choosing the Right Materials
When you start thinking about how to craft a fishing rod, it’s essential to know which materials will give you the best performance. From the rod blank to the guides and reel seat, each component plays a role in how effective your rod will be.
First up is the rod blank. This is the backbone of your fishing rod and can be made from various materials like fiberglass, graphite, or even bamboo. Each material has its pros and cons: fiberglass is flexible and durable, while graphite is lighter and more sensitive, making it easier to feel those subtle bites. Bamboo offers a classic touch but requires more care.
Types of Rod Blanks
Choosing the right rod blank involves considering what type of fishing you’ll be doing. For instance, if you’re going after bigger fish, you’ll want a heavier rod blank that can handle the strain. On the other hand, if you’re targeting smaller species, a lighter blank can give you better sensitivity. Think about your fishing style and choose accordingly.
Next, let’s talk about guides. These are the rings that hold your fishing line in place. They’re typically made from materials like ceramic, stainless steel, or even titanium. Ceramic guides are popular for their smoothness, which reduces line wear. Stainless steel is durable and resistant to corrosion, making it a solid choice for saltwater fishing. Titanium guides are lightweight and incredibly strong, perfect for serious anglers.
Choosing the Right Reel Seat
Finally, don’t overlook the reel seat. This component secures your reel to the rod and should be sturdy enough to handle the forces you’ll encounter while fishing. Materials like aluminum and graphite are common. Aluminum is robust and lightweight, while graphite offers a good balance of strength and weight. Make sure whatever you choose fits well with the rod blank and is comfortable for your grip.
When crafting your fishing rod, think about how the materials work together. A mismatched rod blank and reel seat can throw off your balance and make for an uncomfortable fishing experience. So, choose wisely to enhance your time on the water!
Crafting a fishing rod might seem intimidating at first, but understanding the components makes the process much easier. Let’s break down the essential parts that come together to create a functional and effective rod.

Understanding Rod Components
Every fishing rod consists of several key components, each serving a specific purpose. By knowing what these parts are, you’ll have a clearer idea of how to craft fishing rod that meets your needs.
The rod blank is the backbone of your fishing rod. It’s the long, flexible shaft that gives your rod its strength and sensitivity. Typically made from materials like fiberglass or graphite, the choice of rod blank affects the rod’s action and power, which are crucial for different fishing techniques.
Next, we have the guides. These are the small loops that run along the length of the rod. They help guide the fishing line and reduce friction as you cast. Properly spaced guides can enhance your casting distance and accuracy. Make sure to choose quality guides to ensure they hold up against the wear and tear of fishing.
Then there’s the handle and reel seat. The handle is where you grip the rod, and it’s typically made from materials like cork or EVA foam for comfort. The reel seat is where you attach your fishing reel, and it needs to be secure to prevent any slipping while you’re reeling in a big catch. A well-designed handle and reel seat combination will make your fishing experience more enjoyable.
For example, if you’re crafting a rod specifically for bass fishing, you might opt for a stiffer rod blank and a comfortable handle that allows for quick movements. The right setup can make all the difference when you’re out on the water.
Don’t rush the selection of these components. Each part contributes to the overall performance of your rod, so take your time to choose wisely. Understanding these components will make you feel more confident when you start crafting your fishing rod.
Before you dive into crafting your fishing rod, you’ll need the right tools. Having the proper equipment not only makes the process smoother but also ensures that you create a sturdy and reliable rod.

Tools Required for Crafting
When you’re ready to tackle the project of building your own fishing rod, a few essential tools will help you along the way. From cutting to wrapping and finishing, each tool plays a vital role in the crafting process.
First on the list are cutting tools. A good rod blank needs to be cut to the right length, and a high-quality cutting tool will make this job much easier. You might want to grab a fine-toothed saw or a rod cutter to get clean, precise cuts. Remember, accuracy here is key; even a small mistake can affect your rod’s performance.
Next, let’s talk about wrapping tools. After aligning your guides, you’ll need something to securely attach them. A thread wrapping jig can be incredibly helpful for this part of the process. It keeps everything in place, allowing you to wrap the thread evenly around the guides, which is crucial for strength and durability.
Finally, you’ll need some finish application tools to protect your handiwork. A brush or a spatula designed for epoxy application will help you spread finish evenly over your thread wraps. This not only enhances the rod’s appearance but also adds a layer of protection against water and wear.
When you’re gathering your tools, think about how you’ll work on the rod. For instance, if you have a dedicated workspace, organizing your tools in a toolbox can save you time. You don’t want to waste precious minutes searching for your thread or finish when you’re in the zone!
Having the right tools makes a world of difference while learning how to craft fishing rod. Invest in quality equipment, and you’ll be pleased with the results. Happy crafting!
Assembling your own fishing rod can be a rewarding experience. With the right tools and a bit of patience, you’ll be ready to hit the water in no time.
Step-by-Step Assembly Process
This section will guide you through the essential steps to assemble your fishing rod, from attaching the guides to adding those final touches. Let’s dive in!
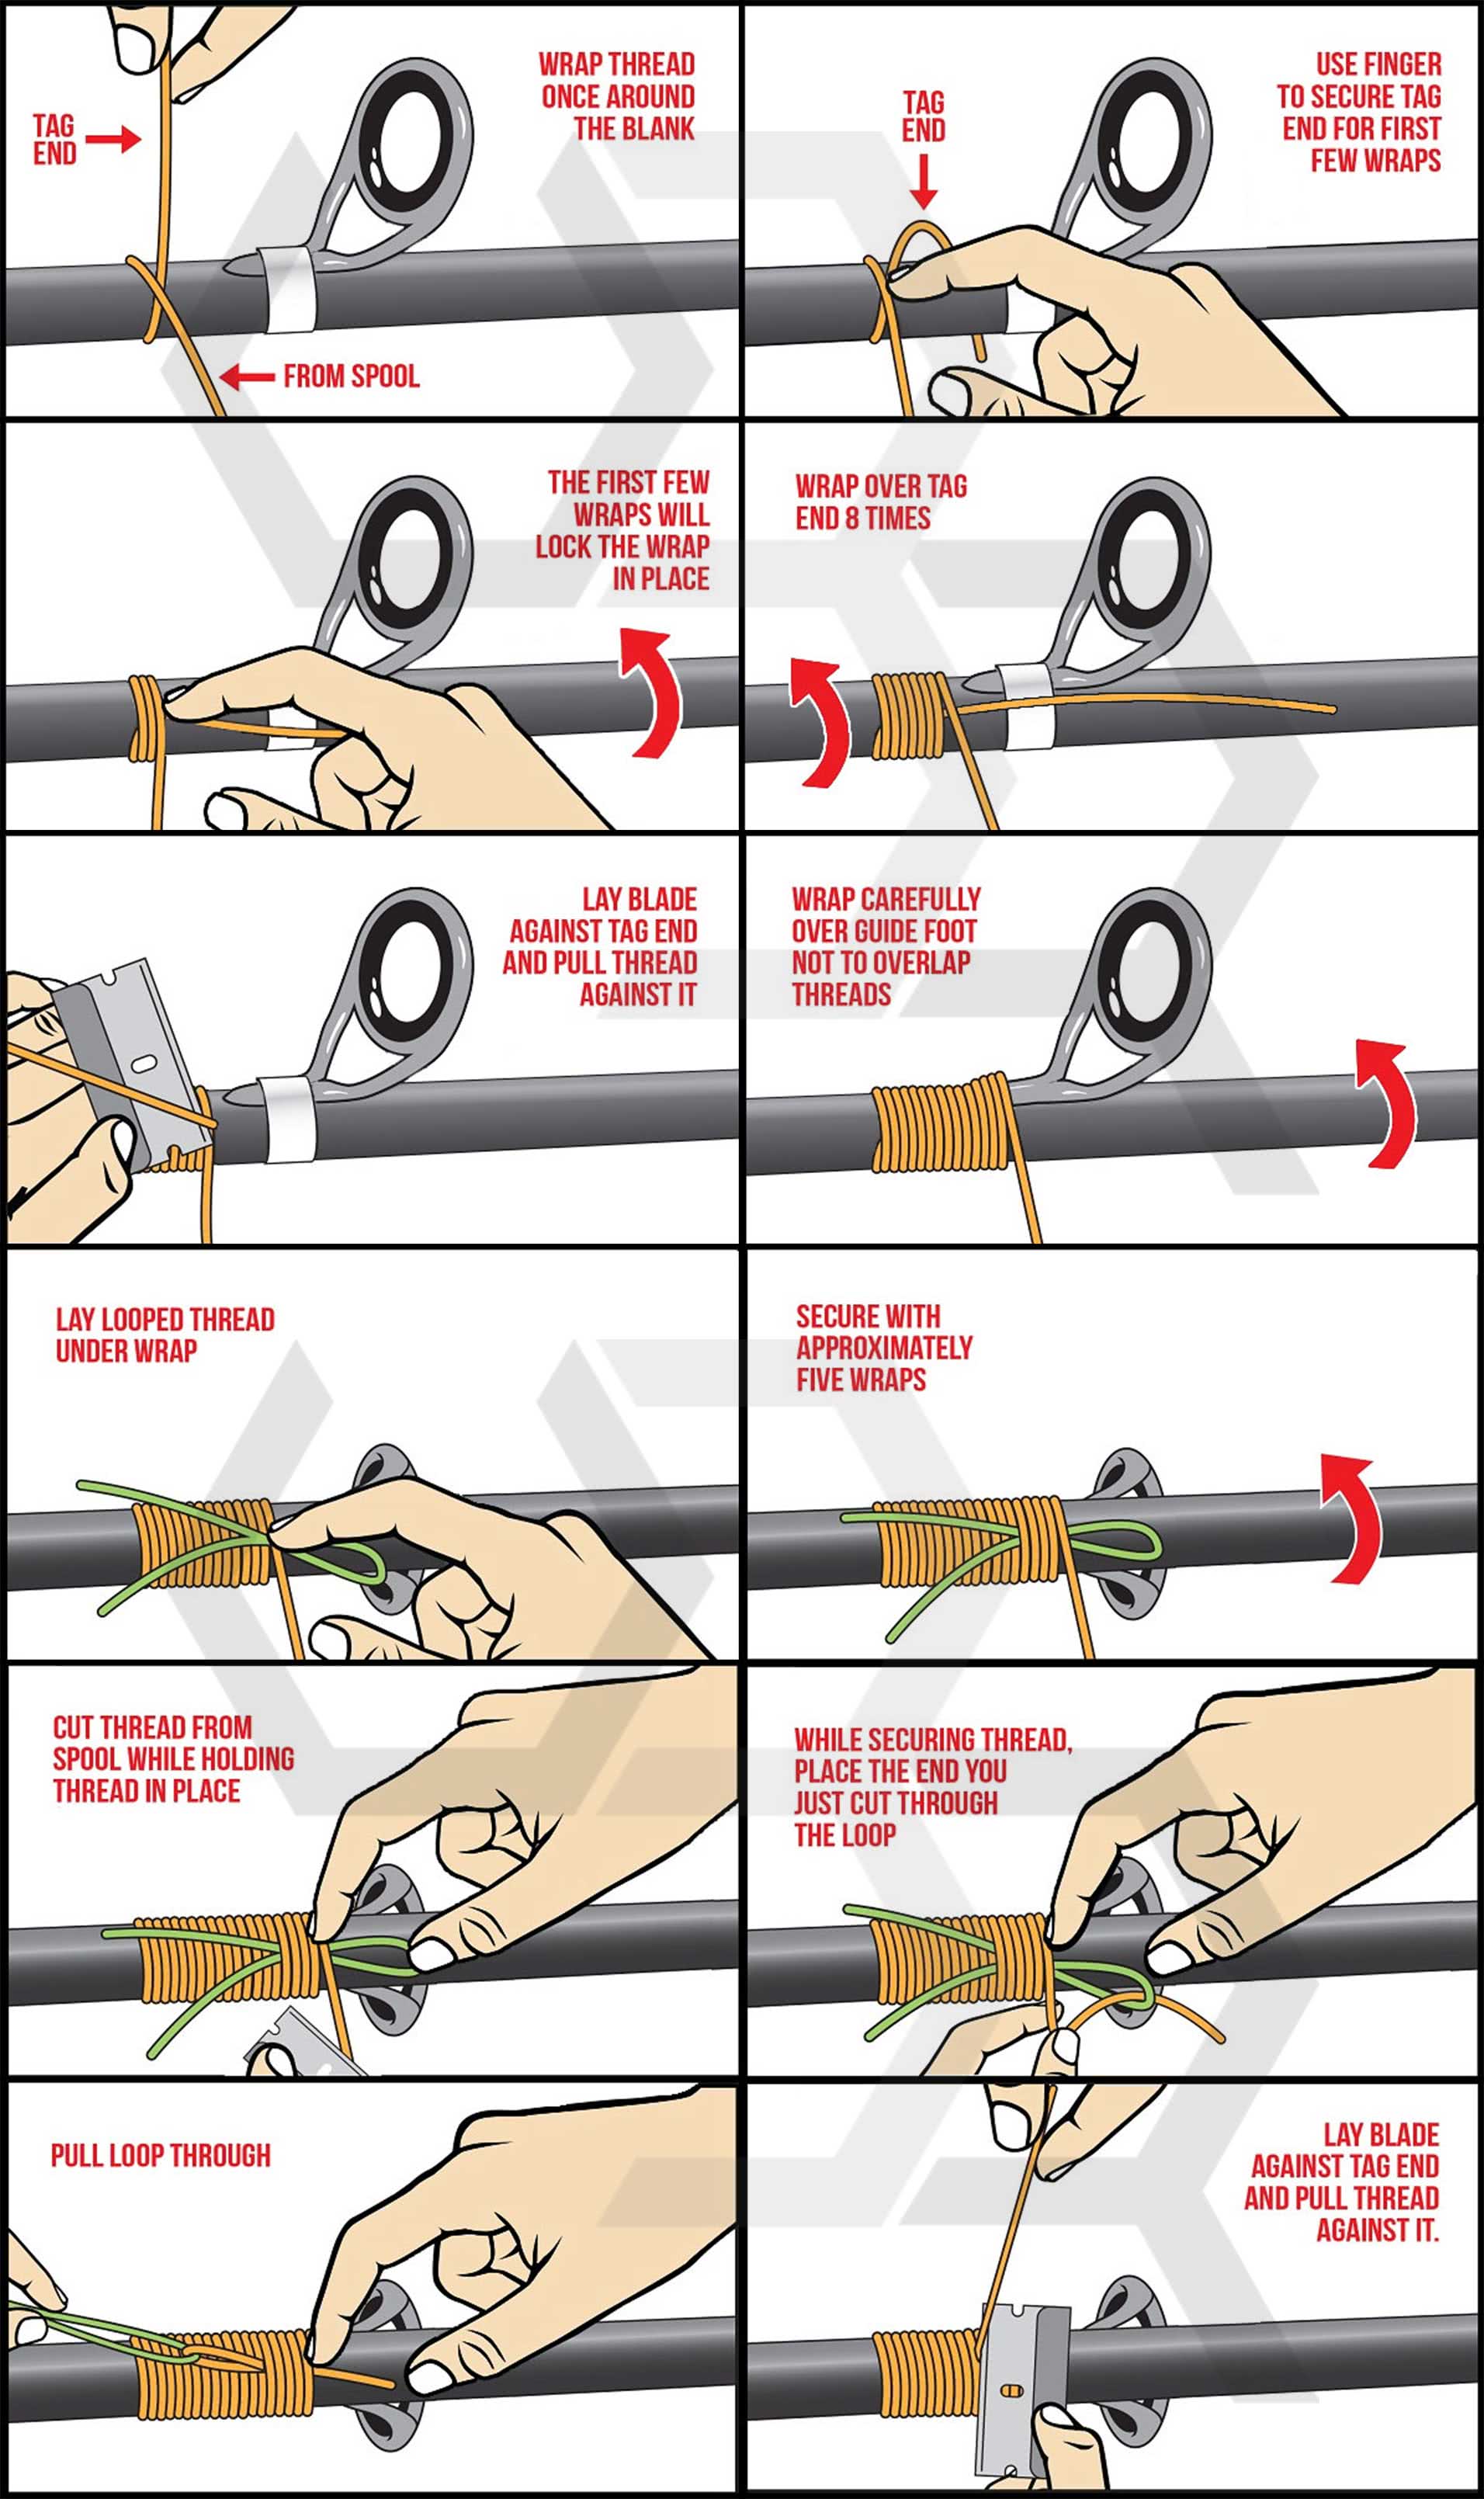
First up, you’ll want to attach the guides. These are the small rings that help your fishing line move smoothly along the rod. Start by placing them on the rod blank in the predetermined positions, usually marked by small dots. Use a bit of tape to hold them in place temporarily while you get ready to wrap them.
Next, it’s time to wrap the rod. Grab your thread and begin at the base of each guide, making tight, overlapping wraps. This might take some practice, but the goal is to create a neat and strong foundation that will hold the guides securely. If you’re unsure about the technique, consider watching a few tutorial videos online to catch the rhythm.
Once you’ve wrapped all the guides, you can move on to applying the finishing touches. This step involves using a special epoxy finish to seal your wraps and protect them from moisture. Mix the epoxy according to the instructions, then use a brush to apply it over the wrapped areas. Be careful not to use too much, as you want a clean look without drips.
Finally, let everything cure in a warm, dry place. A common scenario is to hang your rod vertically to avoid any unevenness in the epoxy. After a day or two, your rod will be ready for action.
Remember, practice makes perfect! The more you assemble rods, the easier this process will become. Plus, each rod you craft can be a unique reflection of your fishing style.
Once you’ve built your fishing rod, it’s time to put it to the test. Fine-tuning your rod ensures it performs at its best, giving you a smooth experience on the water.
Testing and Fine-Tuning Your Rod
Testing your rod isn’t just a good idea—it’s essential. You want to make sure everything feels right and functions smoothly before you head out for your fishing trip.
First up, casting tests are a great way to gauge how your rod handles. Find an open area where you can safely practice casting. Use a variety of weights to see how your rod performs. You’ll want to pay attention to the distance and accuracy of your casts. If something feels off, you might need to tweak your setup.
Next, checking balance is crucial for your rod’s performance. A well-balanced rod will feel comfortable and easy to control. Hold your rod at the grip and see if it feels top-heavy or bottom-heavy. If you notice an imbalance, you may need to adjust the reel seat or add some weight to the rod to achieve that perfect feel.
Adjusting Components
Lastly, don’t forget about adjusting the components. This includes everything from the guides to the reel seat. Make sure the guides are aligned properly; misaligned guides can lead to line tangles and decreased performance. If you notice any parts that don’t seem right, or if the guides aren’t smooth, take the time to fix them. A little adjustment can make a huge difference.
Imagine you’re out on the water, and your rod feels just right. You cast effortlessly, and the line flows smoothly through the guides. That’s the result of good testing and fine-tuning. Take the time to get it right, and you’ll enjoy a better fishing experience every time.
Maintaining your fishing rod is crucial for ensuring it lasts for many seasons. With a few simple steps, you can extend its life and keep it in top shape for your next fishing trip.

Maintenance Tips for Longevity
Proper care involves cleaning, storing, and regularly inspecting your rod. These actions will help you avoid costly repairs or replacements down the line.
First up is cleaning. After a fishing trip, rinse your rod with fresh water to remove any salt, dirt, or grime. Use a soft cloth to wipe down the rod, paying special attention to the guides and reel seat. This simple habit can dramatically extend the lifespan of your gear.
Next, let’s talk about storage. Always store your fishing rod in a cool, dry place. Avoid leaving it in direct sunlight or extreme temperatures, as this can weaken the materials. If you can, use a rod tube or rack to protect it from physical damage. Imagine coming back from a long day of fishing only to find your rod has warped because it was left in the car. Not a great start to your next outing!
Regular inspections are key to spotting potential issues before they become major problems. Check for cracks, loose guides, or damaged reel seats. If you notice anything amiss, take the time to address it right away. Ignoring small issues can lead to bigger headaches later on.
Incorporating these maintenance tips will not only keep your fishing rod in prime condition but also enhance your overall fishing experience. A well-cared-for rod makes for smoother casts and fewer frustrations on the water. So, remember, taking care of your gear is just as important as knowing how to craft fishing rod. Happy fishing!