
How To Set Fishing Rod involves understanding the components and adjusting them for optimal performance. Proper setup is crucial for a successful fishing experience and can significantly impact your catch rate.
Imagine spending a day on the water, but your rod is improperly configured. This guide will help you prepare your rod correctly, so you can focus on what really matters: enjoying your time fishing and reeling in your biggest catch.
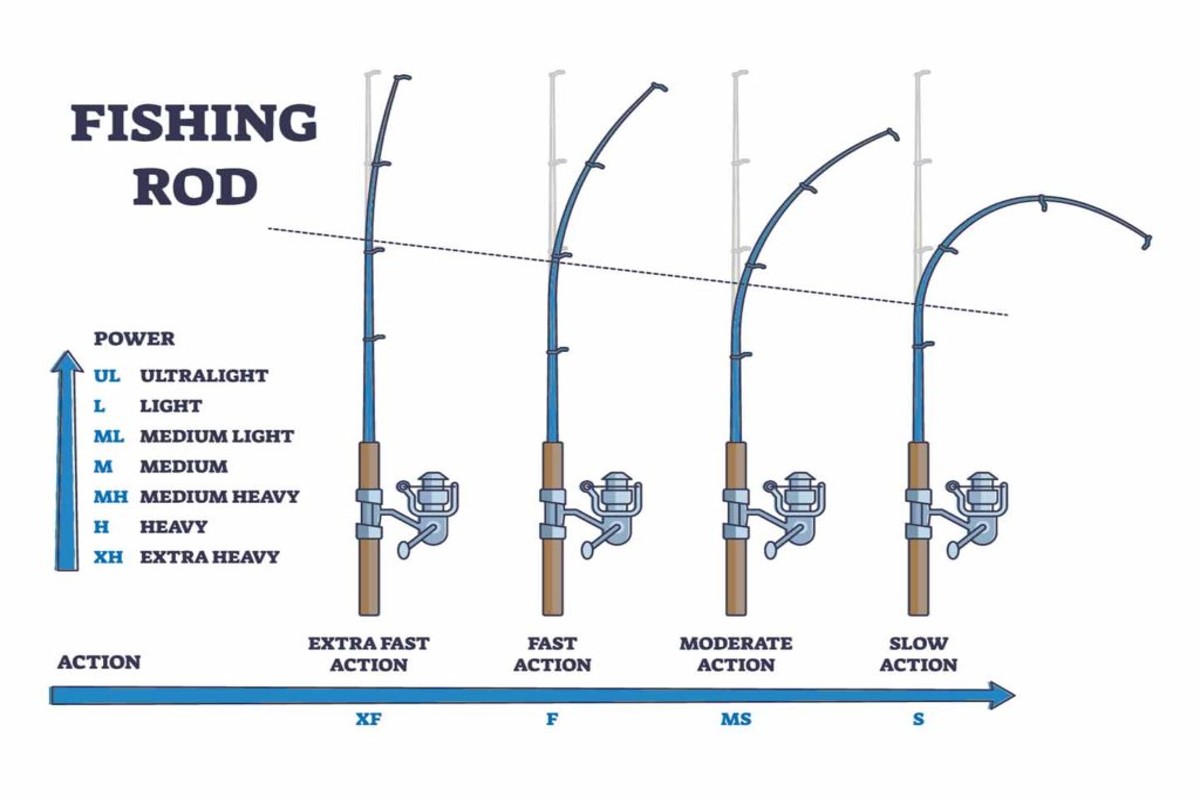
Choosing the right fishing rod is crucial for a successful fishing experience. With so many options available, understanding how to select the appropriate rod based on your fishing type can make all the difference.

Choosing the Right Fishing Rod
When you’re picking a fishing rod, you need to consider the type of fishing you’ll be doing. Different rods are designed for different styles, whether you’re surf casting at the beach, fly fishing in a river, or simply bobbing for bass in a lake.
First, let’s talk about the types of fishing rods. There are three main categories: spinning rods, casting rods, and fly rods. Spinning rods are versatile and great for beginners. Casting rods offer more precision for anglers looking to target specific spots. Fly rods are designed for a unique technique that mimics the movement of insects on water.
Next up is rod length. The length of your fishing rod can significantly impact your casting distance and control. Generally, the longer the rod, the farther you can cast. For instance, if you’re surf fishing, you might want a rod that’s 10-12 feet long to reach the waves. On the other hand, a shorter rod, around 6-7 feet, is more manageable for freshwater fishing in tight spots.
Material plays an essential role too. Fishing rods are typically made from graphite, fiberglass, or a composite of both. Graphite rods are lightweight and sensitive, making them great for feeling even the slightest nibble. Fiberglass rods are durable and flexible, perfect for beginners who may not handle equipment as carefully. A composite rod combines the best of both worlds, offering a balance of sensitivity and strength.
Think about your fishing style when choosing a rod. If you’re planning to fish for larger species like catfish, a heavier rod made of fiberglass might be your best choice. Conversely, if you want to catch trout with finesse, a lightweight graphite rod will serve you well.
Don’t forget about your comfort too. When you’re out on the water, you’ll want a rod that feels good in your hands. Test a few rods in-store to see what weight and grip feel right for you. The connection between you and your rod is crucial for those long days of fishing.
Ultimately, remember that choosing the right fishing rod isn’t just about the specifications. Think about where and how you’ll fish, and select a rod that fits those needs. You’ll be glad you took the time to consider these factors when you’re reeling in your next big catch!
Setting up your fishing rod might seem a bit tricky at first, but understanding its components makes it much easier. Let’s break down the main parts so you can get started with confidence.

Understanding Rod Components
Your fishing rod consists of several key components that work together to give you a smooth fishing experience. Knowing what each part does can help you choose the right rod and set it up correctly.
The first essential part is the reel seat. This is where you attach your fishing reel, and it holds the reel securely in place. Depending on your fishing style, you might prefer a spinning reel seat or a baitcasting reel seat. Each type has its advantages based on the kind of fishing you’ll be doing.
Guides and Tips
Next up are the guides and tips, which are the small rings along the rod. These components help direct the fishing line from the reel to the tip of the rod. They play a crucial role in reducing friction as you cast and retrieve your line. A well-designed guide system allows for longer casts and better control over your bait.
Finally, let’s talk about the handle types. The handle is where you grip the rod, and it comes in various shapes and materials. Some rods have cork handles, while others use EVA foam or rubber. Each material provides a different feel and grip, so it’s worth trying a few to see what feels best in your hands. A comfortable handle makes a big difference during long days out on the water.
When you’re out fishing, take a moment to check your rod components before casting. Ensuring everything is secure and in good condition can save you a lot of hassle on the water and improve your chances of a successful catch. Knowing how to set your fishing rod properly means more time enjoying your fishing adventure!
Setting up your fishing reel properly can make all the difference between a successful day on the water and a frustrating one. Let’s dive into how to attach and adjust your reel so you’re ready to catch some fish.

Setting Up the Reel
Getting your reel set up right is crucial for a smooth fishing experience. You’ll want to ensure that it’s securely attached, the line is threaded correctly, and the drag system is adjusted to suit your fishing style.
First, let’s look at how to attach the reel. Most reels have a simple locking mechanism. You’ll align the reel foot with the reel seat on your rod and tighten the screw or lever until it’s secure. Some reels use a clamp style that requires you to slide the reel into place before locking it down. Make sure it’s snug but don’t overtighten it; you don’t want to damage either the reel or rod.
Next up is threading the line through the guide eyes of your rod. Start from the tip and work your way down, making sure you pull enough line to avoid tangles. When you reach the reel, you’ll need to spool the line correctly. Hold the line in one hand and turn the reel handle with the other to wind it evenly. A common mistake is to overfill the spool, which can lead to backlash when casting.
Drag Adjustment Tips
Adjusting the drag system is another key step. This feature allows you to control how much resistance a fish feels when it pulls on the line. If your drag is too tight, you risk breaking your line when a fish strikes. Conversely, if it’s too loose, the fish might get away. A good rule of thumb is to set the drag to about 25% of your line’s breaking strength.
Imagine you’re out on the lake, and you hook a big one. If your drag is set just right, it’ll give you a fighting chance without risking a snapped line. Adjusting the drag as you reel in can help you maintain control without losing your catch.
Remember, taking the time to properly set your fishing rod and reel pays off. You’ll have a much more enjoyable experience out there when everything is dialed in just right.
Choosing the right fishing line is crucial for a successful day on the water. The line you select can make all the difference in your fishing experience and overall success. Let’s dive into the basics of fishing lines so you can set your rod up for success.

Choosing the Right Fishing Line
When it comes to fishing lines, you’ve got options. The type of line you choose should match your rod, the fish you’re targeting, and the fishing conditions you’ll face.
First off, there are three main types of fishing lines: monofilament, braided, and fluorocarbon. Monofilament is versatile and easy to handle, making it great for beginners. Braided line is super strong and has a smaller diameter, allowing for longer casts. Fluorocarbon is nearly invisible underwater, which is perfect for clear water situations. Each type has its pros and cons, so think about what you’ll be fishing for.
Next, consider the line weight. This is usually measured in pound-test, which indicates how much weight the line can handle before breaking. If you’re targeting larger fish, you’ll want a heavier line. For example, if you’re going after bass, a 12 to 15-pound test might do the trick. But if you’re aiming for something bigger like pike, you might need something in the 20 to 30-pound range.
Spooling the Line Correctly
Once you’ve chosen your line, it’s time to spool it onto your reel. Proper spooling prevents tangles and line twist, which can ruin your day. Start by attaching the line to your reel spool using an arbor knot, then fill the spool while keeping tension on the line. This ensures it lays down evenly, making it easier to cast later.
Before you hit the water, always check your line for any nicks or weaknesses. If you notice any damage, it’s better to replace it than risk losing a big catch. Remember, a well-spooled line can make a huge difference in your fishing success.
Take these tips to heart, and you’ll be well on your way to mastering how to set your fishing rod. The right line can enhance your experience, so don’t rush this step!
When you’re out on the water, a solid fishing knot is essential for securing your hooks and lures. A well-tied knot can make the difference between landing that trophy fish or losing it at the last moment. Let’s dive into tying the perfect fishing knot.

Tying the Perfect Fishing Knot
Choosing the right knot gives you confidence and stability while fishing. Knowing how to tie a few essential knots can help you adapt to different situations and gear types.
There are several popular knot types you should familiarize yourself with. The most commonly used knots include the Improved Clinch Knot, Palomar Knot, and Loop Knot. Each has its unique benefits, making them suited for different fishing scenarios.
Popular Knot Types
- Improved Clinch Knot: Great for securing hooks and lures. It’s simple and strong.
- Palomar Knot: Very strong and easy to tie. Excellent for braided lines.
- Loop Knot: Allows your lure to move freely, which can be a game changer for certain types of fishing.
Now, let’s walk through the steps for tying the Improved Clinch Knot, one of the most reliable knots you can use.
Step-by-Step Tying Instructions
1. Start by threading the line through the eye of the hook, leaving about 6 inches of line.
2. Wrap the tag end around the standing line five to seven times.
3. Take the tag end back through the small loop you created by threading through the eye.
4. Lastly, pull on both the standing line and the tag end to tighten the knot, and trim any excess line.
When tying knots, the strength of the knot is crucial. A poorly tied knot can slip or break under pressure. Here are a few tips to ensure your knots hold strong:
Knot Strength Tips
Make sure you wet the line before tightening the knot. This reduces friction and helps the knot seat properly. Additionally, avoid over-tightening, which can weaken the line. If you’re in a tight spot, consider practicing your knots at home to boost your confidence.
Next time you head out to fish, remember: a well-tied knot means more time reeling in fish instead of retying lines. Mastering how to set fishing rod with the right knots will elevate your fishing game significantly.
When you’re out fishing, the conditions can change everything. Depending on whether you’re in freshwater or saltwater, you’ll need to adjust your setup for the best results.
Adjusting for Different Fishing Conditions
Fishing environments vary greatly, and understanding how to tailor your rod setup to these conditions can make a big difference. From the type of water to the weather, each factor plays a role in how you should fish.
First, let’s talk about the difference between freshwater and saltwater setups. Freshwater fishing often requires lighter lines and smaller hooks, while saltwater fishing typically uses heavier gear to handle bigger fish and rougher conditions. For example, if you’re fishing for bass in a lake, a medium-action rod with a 10-12 lb line works great. But if you’re out on the ocean targeting tuna, you’ll want a heavy rod with a minimum of 40 lb line.
Weather Considerations
Weather can impact fish behavior and feeding patterns. Overcast days may encourage fish to be more active throughout the day, while sunny conditions often push them deeper into the shade. If you’re fishing on a bright day, try using lighter lures that mimic smaller baitfish. On a cloudy day, you might opt for darker colors or larger lures to grab their attention.
Windy conditions also require adjustments. If it’s breezy, you’ll want to use heavier weights to cast farther and keep your line taut. A good technique is to use a slip sinker rig, which allows your bait to move naturally while staying anchored to the bottom.
Target Species Adjustments
Different species of fish have unique preferences that can dictate how you set your rod. For instance, if you’re targeting trout, you might want a lighter rod with a sensitive tip for detecting bites. In contrast, if you’re after catfish, a sturdier rod with a strong backbone is essential for handling their powerful pulls.
Remember, keep an eye on the local fishing reports and talk to other anglers about what’s working for them. They can provide insights into the best setups for the species you want to catch.
As you experiment with your setup, don’t hesitate to make adjustments on the fly. Fishing is often about trial and error, so pay attention to what works best in your specific conditions. Adapting your approach is a key part of learning how to set a fishing rod effectively.