
How To Tie A Fishing Rod involves securely attaching your fishing line to the rod’s reel and guides. This process is crucial for ensuring optimal performance while fishing, helping you catch more fish effectively.
Whether you’re a beginner or an experienced angler, knowing how to tie a fishing rod can enhance your fishing experience. Properly tying your setup can prevent tangles and improve your casting accuracy, making your time on the water more enjoyable.
Before you dive into how to tie a fishing rod, it’s crucial to understand the main components of the rod itself. Knowing these parts will make the tying process easier and more effective.

Understanding Fishing Rod Components
Each fishing rod is made up of several key components that play a role in its overall performance. Familiarizing yourself with these parts will help you know where to tie your line and how to set everything up for success.
The first part you should be aware of is the rod blank. This is the main body of the rod, usually made from materials like graphite or fiberglass. The blank gives the rod its strength and flexibility, and it’s where the guides are attached.
Next, we have the guides. These are small rings that line the rod blank and help direct the fishing line along the rod. They’re essential for smooth line movement and reducing friction. If you’ve ever had your line snagged, it’s likely due to an issue with the guides.
The last component to know about is the reel seat. This part holds the fishing reel securely in place and allows you to control the line better during casting and reeling. If the reel seat isn’t tight, your reel could come loose while you’re fishing, which can be a real hassle.
Understanding these components will not only make the process of how to tie a fishing rod easier but also improve your overall fishing experience. For example, if you’re out on the water and notice that your line isn’t flowing smoothly, a quick check of the guides might save your day.
So before you start tying, get to know your rod. It’ll pay off when you’re out there trying to catch the big one! Remember, a well-prepared rod is your best friend in the fishing game.
Choosing the right fishing line is crucial when learning how to tie a fishing rod. The line you select can make a big difference in your fishing experience, affecting everything from casting distance to the ability to reel in your catch.

Choosing the Right Fishing Line
There are a few main types of fishing lines to consider, each with its own strengths and weaknesses. Understanding these differences will help you make the best choice for your fishing style and needs.
First up is monofilament line. This is the most common type and is great for beginners. It’s flexible, easy to handle, and floats on the water’s surface, making it ideal for top-water fishing. However, it can be more visible to fish and is susceptible to UV damage over time.
Then there’s fluorocarbon line. This option is virtually invisible underwater, which can be a game-changer when you’re trying to catch shy fish. It sinks well, making it perfect for deep-water fishing. Nevertheless, it tends to be less forgiving than monofilament when it comes to knot strength.
Now let’s talk about braided line. This type is known for its incredible strength and thin diameter. You can fit more line on your reel because it takes up less space, which is a huge advantage when you’re trying to catch bigger fish. However, braided line doesn’t stretch as much as others, so you need to be careful when setting the hook.
Line Strength Considerations
When choosing your fishing line, consider the line strength that matches your target species. Each type of line comes in various pound test ratings, indicating how much weight it can handle. If you’re going after larger fish like pike or bass, you’ll want a stronger line to ensure you can reel them in without snapping.
Imagine you’re out on the lake, excited to catch that trophy fish. You’ve picked your spot and cast your line. If you chose a line that’s too weak, that fish might break free, leaving you frustrated. Pick a line that suits both your fishing style and the fish you’re targeting for the best experience.
Always keep in mind the conditions you’ll be fishing in. Whether you’re fishing in rocky areas or thick weeds, the right line can make all the difference. So think carefully before you tie that fishing rod, and your chances of success will increase significantly.
Tying your fishing line to the reel might seem tricky at first, but with a little practice, you’ll get the hang of it in no time. This step-by-step guide will walk you through the process, ensuring that your line is secure and ready for your next fishing adventure.

Step-by-Step Guide to Tying the Reel
Getting your fishing line properly tied to the reel is crucial for a successful day on the water. Follow these detailed steps to make sure your line is securely attached and ready to reel in that big catch.
First, you’ll need to thread the line through the reel. Start by pulling out a length of line from the spool. Locate the line guide on the reel and feed the line through it, ensuring it runs smoothly without any tangles. Once it’s through, pull enough line to work with, usually around 5 to 6 feet.
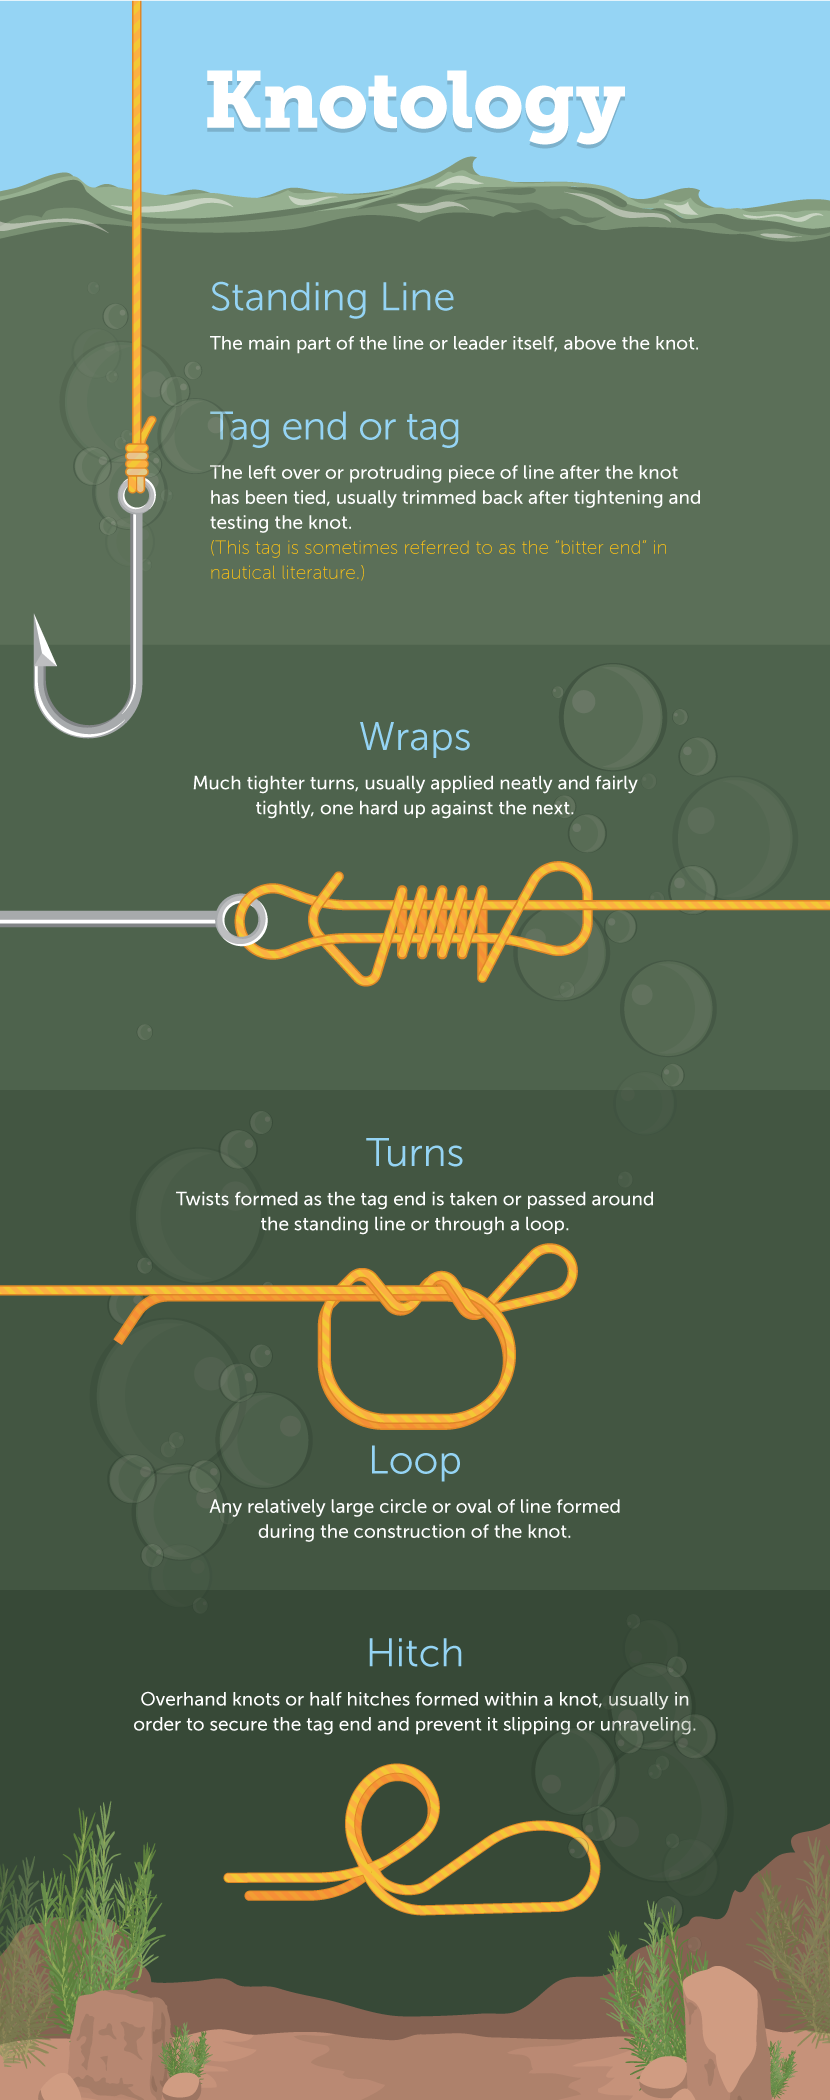
Next, you’ll want to secure the knot. A reliable knot, like the Arbor knot, is perfect for this. Wrap the line around the spool, then create a loop with the end of the line. Pass the end of the line through the loop, and pull it tight. Make sure to leave a tag end that’s a few inches long to help with securing the knot further.
Once your knot is tied, it’s time to test the strength. Gently pull on the line to ensure that the knot is secure and won’t slip. If it feels loose or weak, don’t hesitate to redo it. You want to be confident that your line is ready for whatever fish might bite!
Imagine you’re at your favorite fishing spot, and you cast your line with confidence. You feel a tug, and as you reel in, you know your knot is holding strong. That’s the kind of assurance a well-tied knot provides.
As a practical tip, always moisten the knot before tightening it. This helps reduce friction and ensures a tighter grip. With a bit of practice, you’ll master how to tie a fishing rod like a pro!
Tying line to your fishing rod guides is a crucial step that can make or break your fishing experience. Getting this right ensures smooth casting and helps avoid frustrating tangles.
Tying Line to Rod Guides
In this section, you’ll learn the effective way to thread your fishing line through the rod guides, making sure everything is set up for a successful day on the water.
Start at the reel. When you’re ready to tie the line, pull out a good length from your reel. This length should be enough to work with, but not so much that it becomes unwieldy. It’s a good idea to keep about 3 to 4 feet of line handy for threading through the guides.
Now, begin to feed the line through the first guide closest to the reel. Make sure to follow the natural path of the guides, which typically go from larger at the bottom to smaller at the tip. This is crucial for proper spacing of the line and helps prevent it from getting pinched or tangled.
As you continue to thread the line through the guides, keep an eye on the spacing. You want to ensure that there’s enough slack for flexibility but not so much that it creates potential tangles. A good rule of thumb is to leave about a finger’s width of space between the line and the rod as you go.
One common mistake is to skip guides or go out of order, which can lead to complications later. Be patient and take your time. If you’re in a hurry, you might overlook a guide, and that’ll only lead to frustration when casting.
Lastly, if you find that the line is tangling as you thread it, don’t hesitate to stop and straighten it out. Twisted or knotted line can result in hiccups when you’re reeling in a big catch. A little extra time spent ensuring everything is organized will pay off in the long run.
Before you head out on your fishing trip, take a moment to double-check your setup. A well-tied line through the guides can make a big difference in your fishing success, so make sure you’ve got it right. Happy fishing!
When it comes to fishing, knowing how to tie a fishing rod isn’t just about the rod itself. A critical part of your setup is the knots you use to secure your fishing line. Different knots serve different purposes, so let’s break down some of the most common ones.

Common Knots for Fishing Lines
Having the right knots can make all the difference in your fishing experience. Each knot has its own strengths and weaknesses, which can affect your catch rate. Here are three popular options that every angler should know.
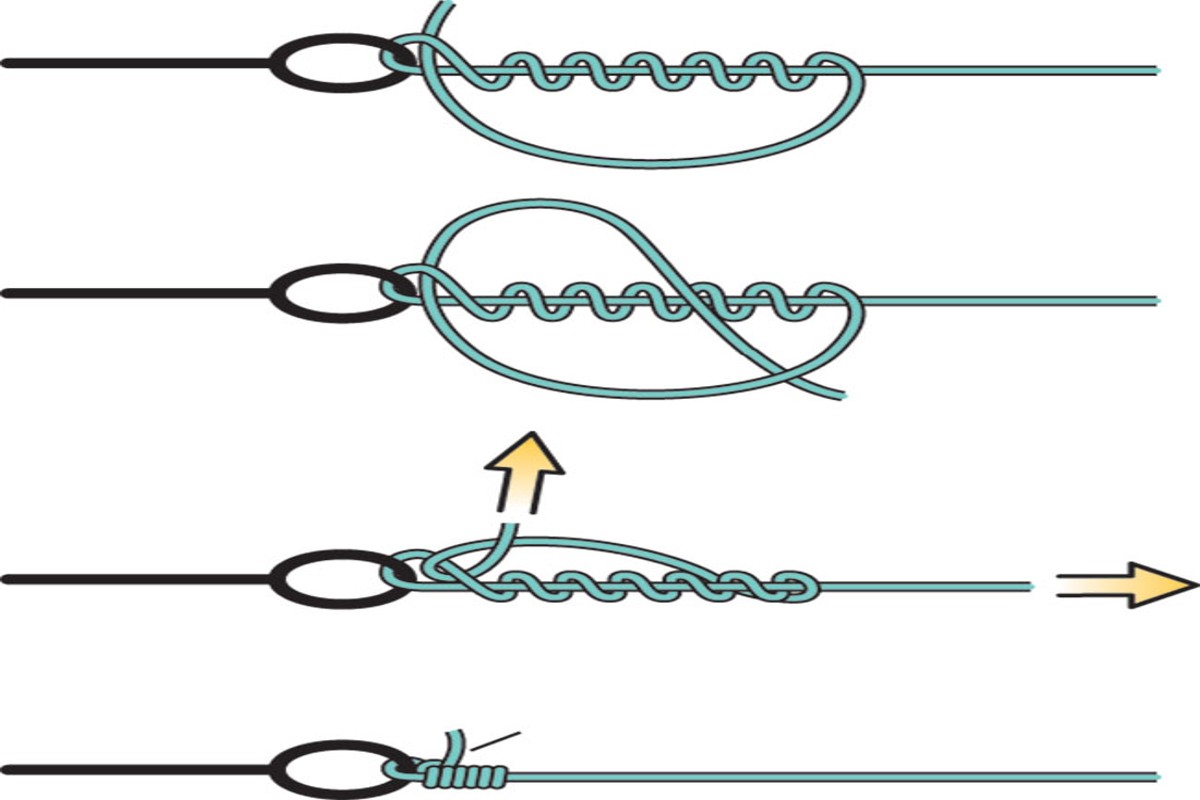
Palomar Knot: This knot is often praised for its strength and simplicity. It’s double-stranded, which means it can handle heavier loads without breaking. The downside? It can be tricky to tie if you’re not used to it, especially in low-light conditions.
Improved Clinch Knot: A favorite among many anglers, this knot provides a reliable hold on hooks and lures. It’s relatively easy to tie, making it a go-to for beginners. However, it might slip under heavy strain or with lighter lines, so be mindful of the conditions.
Loop Knot: This knot allows for more freedom of movement for your lure, which can be a game changer when fishing in certain environments. It’s great for maintaining the action of your bait. The catch? It can be less secure than other knots, so make sure to check your line regularly.
Next time you’re out on the water, think about the knot you’re using. A well-tied knot can mean the difference between reeling in a trophy fish or losing it at the last moment. Experiment with these options to find what works best for you, and you’ll be set for your next fishing adventure!
Taking care of your fishing rod and line is just as crucial as knowing how to tie a fishing rod. Regular maintenance ensures your gear stays in top shape, allowing you to enjoy fishing for years to come.
Tips for Maintaining Your Fishing Setup
By following a few simple maintenance tips, you can keep your fishing setup in great condition. This not only improves performance but also prolongs the life of your equipment.
First, make it a habit to conduct regular inspections of your rod and reel. Check for any signs of wear or damage, such as cracks in the rod or rust on the reel. If you notice anything unusual, address it right away to avoid bigger issues later.
Next, cleaning your rod and reel after each use can make a huge difference. A quick rinse with fresh water removes salt and dirt that can cause corrosion. For the reel, give it a thorough wipe down and, if needed, apply some reel oil to keep the mechanics running smoothly.
Proper storage techniques also play a key role in maintaining your fishing setup. When you’re not using your gear, store it in a cool, dry place. Avoid leaving your rod in direct sunlight or in a hot car, as this can weaken the materials over time. Consider using a rod holder or a protective case to prevent any accidental damage.
For example, if you just finished a day of fishing at the lake, take a few minutes to rinse everything off before you pack up. This small effort can save you a lot of trouble down the line.
Make these maintenance practices a part of your routine, and you’ll ensure your fishing rod and line are always ready for your next adventure.