
How To Repair The Tip Of A Fishing Rod involves assessing the damage, gathering materials, and following a step-by-step repair process. This ensures your rod is functional and ready for use.
If you’ve ever experienced a broken rod tip while fishing, you know how frustrating it can be. Knowing how to fix it can save you time and money, helping you get back to enjoying your favorite pastime quickly.
When your fishing rod tip gets damaged, it can be frustrating, but don’t worry! Assessing the damage is the first step in figuring out how to fix it.

Assessing the Damage
Before you jump into repairs, take a good look at the rod tip and the guides. Knowing what you’re dealing with will help you decide if you can fix it yourself or if you need a replacement part.
Start by inspecting the rod tip closely. Look for any visible cracks or breaks. A small crack might be repairable with some epoxy, but a significant break could mean you need a whole new tip. If you see any fractures, it’s a sign that the integrity of the rod is compromised.
Next, check the guides along the rod. Make sure they’re aligned properly. If a guide is bent or out of place, it can affect your line and casting. Sometimes, a simple adjustment can save you from a bigger headache later.
Now, ask yourself if you can repair the damage. If the tip is broken beyond repair or the guides are misaligned to the point of no return, replacement is likely your best option. Remember, it’s better to invest in quality repairs than to risk losing your catch due to a faulty rod.
For instance, imagine you’re out on the lake, and your tip snaps while casting. If you’ve assessed the damage beforehand, you’ll know whether you can use a quick fix or if it’s time to head to the shop for a new tip. Knowing how to assess the situation can save you time and frustration.
Take your time during the assessment. A careful inspection now can save you a lot of trouble later when you’re out fishing. Remember, learning how to repair the tip of a fishing rod starts with knowing what you’re dealing with!
Before you start the repair process, you’ll need to gather a few essential materials. Having everything on hand will make the job smoother and ensure you don’t have to pause halfway through.

Gathering Necessary Materials
Repairing the tip of your fishing rod involves a few key tools and materials. Knowing what you need ahead of time will save you from unnecessary trips to the store.
First, let’s talk about adhesives. You’ll generally want a strong epoxy or a specialized rod adhesive. These types of glue are designed to withstand the stress of fishing without breaking down in water. If you’re unsure, a quick search for “fishing rod adhesive” will yield plenty of options.
Next up are replacement tips and guides. Depending on your rod, you might be looking for a specific size or type. They come in various materials, including ceramic and metal, each with its benefits. Make sure to measure the broken tip to find the right fit, or take it with you to the store for a perfect match!
Lastly, gather some basic tools like scissors and pliers. Scissors will help you trim any excess line or adhesive, while pliers are great for gripping and maneuvering smaller pieces. You may also want a small file to smooth out any rough edges on the new tip.
Let’s say you’re in the middle of a fishing trip and your rod tip snaps. Having these materials ready means you can quickly fix it and get back to casting, instead of spending hours searching for what you need. Remember, being prepared can make all the difference when you’re out on the water.
Repairing the tip of a fishing rod can seem daunting, but it’s a straightforward process that saves you time and money. By following these steps, you’ll have your rod ready for your next fishing adventure in no time.

Step-by-Step Repair Process
In this section, we’ll break down the exact steps you need to follow to effectively repair the tip of your fishing rod. Just remember, patience is key during this process!
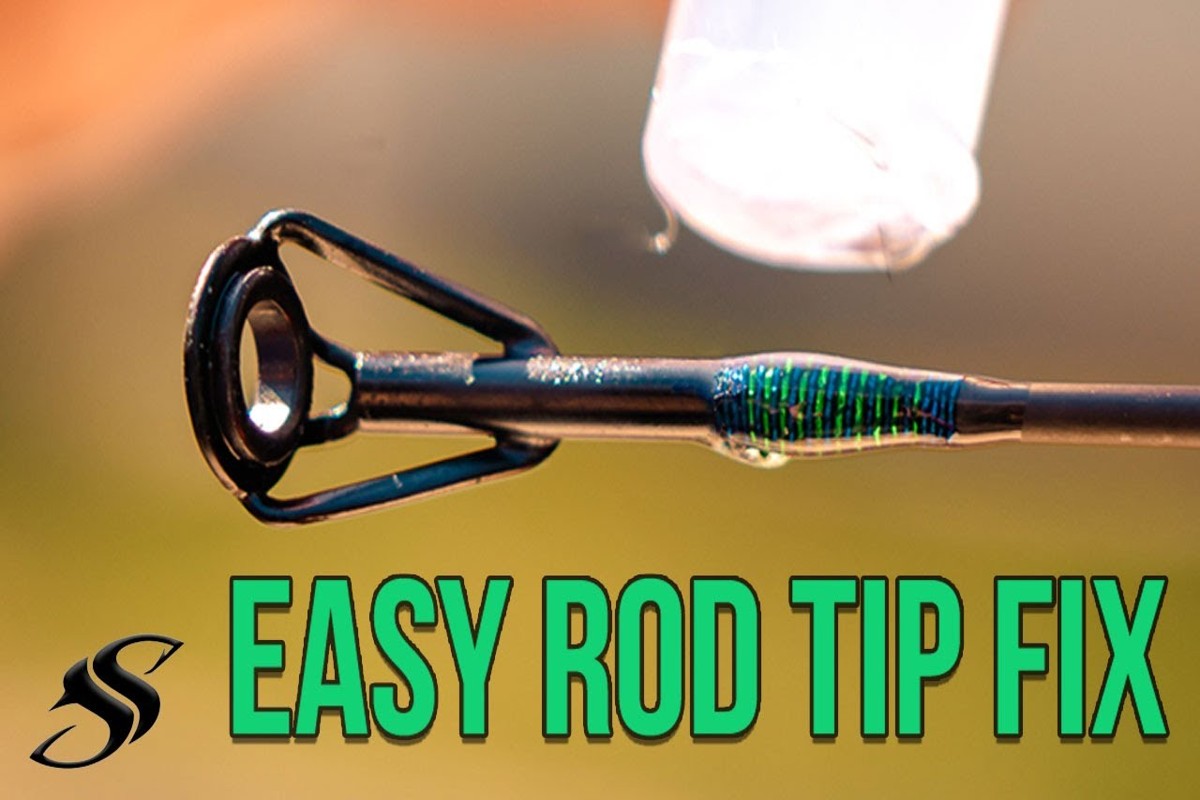
First, start by cleaning the damaged area of the rod. Use rubbing alcohol or a similar cleaner to remove any dirt, grime, or old adhesive. This ensures a strong bond when you apply the new tip.
Next, apply a strong adhesive specifically designed for fishing rods to the end of the rod. Make sure to cover the area evenly. Then, take your new rod tip and carefully align it with the cleaned area. Press it down firmly and hold it for a few seconds to secure the bond.
After attaching the new tip, it’s crucial to allow sufficient curing time for the adhesive. Depending on the type of glue you used, this can take anywhere from a few hours to a full day. Make sure the rod is placed in a cool, dry area during this time.
For example, if you’re planning a fishing trip this weekend, start the repair at least a couple of days in advance. This way, you’ll ensure that your rod is fully cured and ready for action.
A practical tip: always have a repair kit handy with adhesive, spare tips, and cleaning materials. This way, you’ll be prepared for any unexpected mishaps on your fishing trips!
Once you’ve completed the repairs on your fishing rod’s tip, it’s time to put your work to the test. This is a crucial step to ensure everything is stable, strong, and ready for your next fishing adventure.

Testing the Repair
Testing your repair helps you confirm that the tip can handle the stress of fishing. You want to make sure everything feels right before you head out to the water.
First, check for stability and strength. Hold the rod firmly and apply gentle pressure at the tip. You should feel a solid connection without any wobbling or flexing that feels out of place. If the repair feels weak, you might need to reinforce it again. It’s better to catch any issues now than to risk losing a big catch later.
Next, perform a casting test. Grab a practice lure and head to your favorite casting area. Make a few casts to see how the repaired tip responds. Pay attention to how it feels during the cast and the accuracy of your throws. A well-repaired tip should allow for smooth, precise casts without any unexpected vibrations.
Finally, inspect for any remaining issues. After your casting test, take a close look at the tip and the surrounding areas. Look for cracks, loose wraps, or any signs that the repair might not be holding up. If you notice anything off, don’t hesitate to address it before your next fishing trip.
For instance, imagine you’re out on the lake, excited to reel in that trophy fish, only to find your rod tip has a weak spot. That’s a frustrating scenario! So, taking the time to thoroughly test your repair will save you from that disappointment.
Always remember, a well-tested rod can make all the difference in your fishing experience. So, make sure you know how to repair the tip of a fishing rod and give it the attention it deserves. Happy fishing!
Taking care of your fishing rod is key to keeping it in top shape for years to come. By following a few simple practices, you can avoid the hassle of repairs and keep your gear ready for the next big catch. Here’s how to prevent damage to the tip of your fishing rod.

Preventive Measures for Future Repairs
Preventive care is essential if you want to avoid frequent repairs on your fishing rod. Simple actions like proper storage, regular inspections, and using protective gear can make a world of difference.
First up, proper storage techniques. When you’re not using your rod, always store it in a rod holder or a protective case. This keeps it safe from accidental bumps or falls that could damage the tip. For example, if you toss your rod in the back of your truck without protection, you risk it getting knocked around, leading to costly repairs later.
Next, regular inspections are crucial. Make it a habit to check your rod before and after every fishing trip. Look for any signs of wear or damage, especially at the tip. Early detection can save you from a bigger problem down the road. If you spot a crack or frayed line, address it immediately to avoid needing to learn how to repair the tip of a fishing rod again.
Finally, consider using protective rod tips. These little accessories can be a lifesaver. They wrap around the tip of your rod, offering an extra layer of protection against knocks and scrapes. It might seem like a small investment, but it can save you time and money by preventing damage before it happens.
Remember, the care you give your fishing rod directly impacts its longevity. By implementing these preventive measures, you can enjoy your fishing adventures without the worry of frequent repairs.
Knowing when to handle repairs yourself and when to call in a professional can save you time and money. Some damage is just too severe or specialized for a DIY fix. If you’re unsure, this section will help you decide when to seek professional help.
When to Seek Professional Help
While many fishing rod repairs can be tackled at home, some situations call for expert intervention. Understanding these scenarios will ensure your rod gets the best care possible.
Severe structural damage is a clear indicator that you should consult a professional. If the tip of your rod is broken off and there’s significant splintering or bending, attempting a DIY fix could compromise its integrity further. A pro can assess the damage properly and determine if it can be repaired or if a replacement is necessary.
High-end rod repairs also warrant professional expertise. If you own a pricey rod with specialized materials, like graphite or carbon fiber, it’s best to leave repairs to someone experienced with those materials. For example, if a custom rod you invested in breaks at the tip, a skilled technician will know how to restore it without diminishing its value.
Time constraints can also be a factor in your decision to seek help. If you’re gearing up for a fishing trip and need a quick fix, a professional service can often expedite repairs. You don’t want to risk missing out on a great fishing day because of a simple rod issue that could’ve been fixed by an expert in just a few hours.
Trust your instincts—if a repair feels beyond your skill level or if the rod holds sentimental or high monetary value, don’t hesitate to get professional help. It can save you from further damage and frustration down the line.