
How To Set Up My Fishing Rod involves selecting the right components, assembling them properly, and ensuring everything is ready for fishing. This process is crucial for beginners and experienced anglers alike to maximize their fishing success.
Imagine heading to your favorite fishing spot with all your gear, only to find your rod isn’t set up correctly. By following these simple steps, you can ensure that your rod is ready for a great day on the water.
Choosing the right fishing rod is crucial for a successful fishing trip. The right rod can make all the difference in your comfort and efficiency on the water.

Choosing the Right Fishing Rod
With so many fishing rods available, selecting one that fits your needs can be overwhelming. Understanding the types of rods, their lengths, actions, and how they match your fishing style is key.
First, let’s look at the main types of fishing rods. You’ll find spinning rods, baitcasting rods, fly rods, and surf rods. Each type has its unique design and purpose, so think about what kind of fishing you plan to do.
Types of Fishing Rods
- Spinning Rods: Great for beginners and versatile for a range of fishing styles.
- Baitcasting Rods: Best for experienced anglers looking for precision.
- Fly Rods: Designed specifically for fly fishing, these require more technique.
- Surf Rods: Ideal for fishing from the shore, they’re longer and stronger.
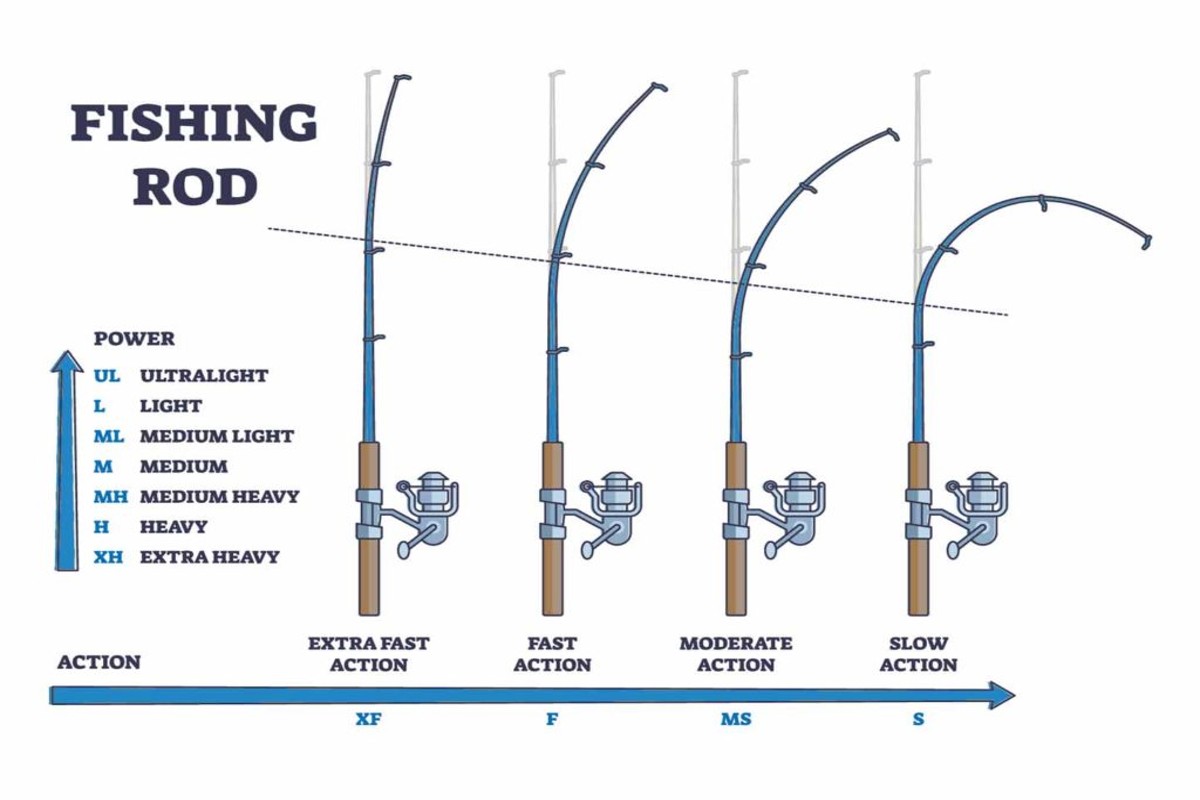
Next up is length and action. The length of your rod affects casting distance and control. Generally, longer rods cast farther, while shorter rods offer better accuracy. As for action, it refers to how much the rod bends when you apply pressure. A fast action rod bends near the tip, giving you quick sensitivity, while a slow action rod flexes more, making it better for larger fish.
When selecting your rod, think about how you like to fish. If you enjoy casting lures from the shore, a medium-length spinning rod with a fast action might be perfect. On the other hand, if you’re planning to fish in deeper waters with heavier baits, a heavier baitcasting rod could be your best bet.
For example, imagine you’re heading to a local lake for bass fishing. A 6.5-foot medium-action spinning rod can give you the versatility to change lures easily and handle different fishing conditions. It’s a solid choice that won’t leave you frustrated when that big fish bites!
Remember, the best rod is one that feels comfortable in your hands and suits your fishing style. Don’t hesitate to test a few before making your final decision. Finding the right fishing rod is a key step in learning how to set up my fishing rod effectively.
Choosing the right reel is crucial for optimizing your fishing experience. A good reel can enhance your technique and make casting and reeling in fish much easier.

Selecting the Proper Reel
When it comes to selecting a fishing reel, you’ll want to consider both the type and size that best matches your rod and fishing style. This choice can significantly impact your success on the water.
First, let’s look at the two main types of reels: spinning and baitcasting. Spinning reels are user-friendly and versatile, making them great for beginners. They work well with lighter lures and are perfect for finesse fishing. On the other hand, baitcasting reels offer more control and precision, ideal for heavier lures and specific techniques like flipping or pitching. If you’re just starting, a spinning reel might be the way to go.
Next, you’ll want to consider the reel size and gear ratio. Reel sizes generally range from small (1000-2500) to large (4000 and above). A smaller reel is perfect for light tackle and finesse fishing, while larger sizes are designed for bigger species. The gear ratio determines how fast you can retrieve your line. A higher gear ratio means quicker retrieves, which is great for fast-moving fish, while a lower ratio provides more torque for reeling in larger catches.
Balancing Rod and Reel
Once you’ve narrowed down your options, balancing your rod and reel is essential for comfort and efficiency. A well-balanced setup reduces fatigue and improves your casting accuracy. When holding the rod, the balance point should be near the reel seat. If the reel feels too heavy or light, it might be worth trying a different size or type.
For example, if you’re using a medium-action rod, pairing it with a medium-sized spinning reel will likely give you the best balance. Picture yourself casting out into a serene lake, feeling the perfect weight in your hands—this balance can make your time on the water so much more enjoyable.
Always remember to consider your fishing technique when choosing your reel. The right combination can elevate your fishing game and lead to more successful outings!
Attaching the reel to your fishing rod is a straightforward process that sets the stage for a successful day on the water. Just follow these simple steps to ensure your reel is securely in place.

Attaching the Reel to the Rod
Getting your reel attached correctly is crucial for smooth casting and reeling in your catch. Let’s break it down into easy steps so you can focus on fishing rather than fiddling with your gear.
First, locate the reel seat on your fishing rod. This is usually located towards the bottom of the rod, often designed as a holder that will clamp down on the reel foot. It’s important to find this spot before moving on to the next step.
Next, insert the reel foot into the reel seat. Align the foot of your reel with the opening of the reel seat. Gently slide it in until it fits snugly. Make sure the reel is oriented correctly, with the handle positioned on the side that feels most comfortable for you.
Once the reel foot is in place, it’s time to tighten it securely. Most reel seats have a locking mechanism, such as a screw or a clamp, that you can twist to hold the reel firmly. Give it a good twist, but don’t overdo it—too much pressure can damage the rod or reel.
For example, if you’re heading out to the lake with friends and you want to show off your new gear, a well-attached reel will make all the difference. You won’t have to worry about it coming loose while you’re trying to reel in that big catch!
Always double-check that everything feels tight and secure before you head out. A properly attached reel will not only enhance your fishing experience but also increase your chances of landing that trophy fish!
Spooling your fishing line is a crucial step in setting up your fishing rod. A properly spooled line can make a significant difference in your fishing experience, helping you avoid tangles and ensuring smooth casts.

Spooling the Fishing Line
Getting the right fishing line and spooling it correctly will set you up for success on the water. Whether you’re using monofilament, fluorocarbon, or braided line, each has its advantages, and knowing how to spool it right can save you from frustration.
First off, choosing the right fishing line is essential. Monofilament is great for beginners because it’s flexible and easy to handle. Fluorocarbon is nearly invisible underwater, making it perfect for clear water conditions. Braided line, on the other hand, offers incredible strength and sensitivity, but it can be a bit tricky to manage. Think about your fishing style and the environment before making a choice.
Now, let’s talk about how to spool line correctly. Start by securing the spool of line to a stable surface. Thread the line through the rod guides, making sure to follow the path from the tip down to the reel. You want to bring the line to the reel with a little tension—this helps prevent loose coils. As you wind the line onto the reel, keep your fingers on the line to ensure it’s evenly distributed across the spool.
One common issue that many anglers face is line twists and tangles. To avoid this, make sure the line comes off the spool in the same direction that it will be wound onto the reel. If you’re spooling your reel and notice twists forming, you might want to pause and let the line unwind a bit. This simple trick can save you a lot of headaches later.
Picture this: you’re out on the lake, casting away, when suddenly your line tangles and ruins your day. By taking the time to spool your line correctly, you can prevent such frustrating moments. Remember, it’s all about being patient and precise.
As a practical tip, consider using a line conditioner when spooling your line. This helps reduce memory and keeps your line from twisting as you cast. A little extra care goes a long way in ensuring your fishing rod is set up right!
When you’re gearing up for a fishing trip, knowing how to tie the right knots can make all the difference. It’s not just about having the best fishing rod or reel; your knots are key to landing that big catch.
Tying Fishing Knots
Mastering a few essential fishing knots will help you securely attach lures and hooks to your line. Let’s dive into the most common knots you’ll need and how to tie them properly.
The Palomar knot and the Improved Clinch knot are two of the most reliable knots in fishing. They’re easy to tie and can handle the stress of a big fish tugging at your line. Let’s break down each one.
Palomar Knot
The Palomar knot is favored for its strength and simplicity. Here’s how to tie it:
- Double about six inches of line and pass it through the eye of your hook or lure.
- Then, tie a simple overhand knot with the doubled line, but do not pull it tight just yet.
- Take the end of the line and pass it through the loop you just created.
- Finally, pull on both ends of the line to tighten the knot and trim any excess.
This knot is perfect for heavier lures and is generally used when you’re targeting larger fish. Its strength is key when you’re faced with the challenge of a big catch.
Improved Clinch Knot
Next up is the Improved Clinch knot, another essential knot that’s great for securing lighter hooks and lures. Here’s how to do it:
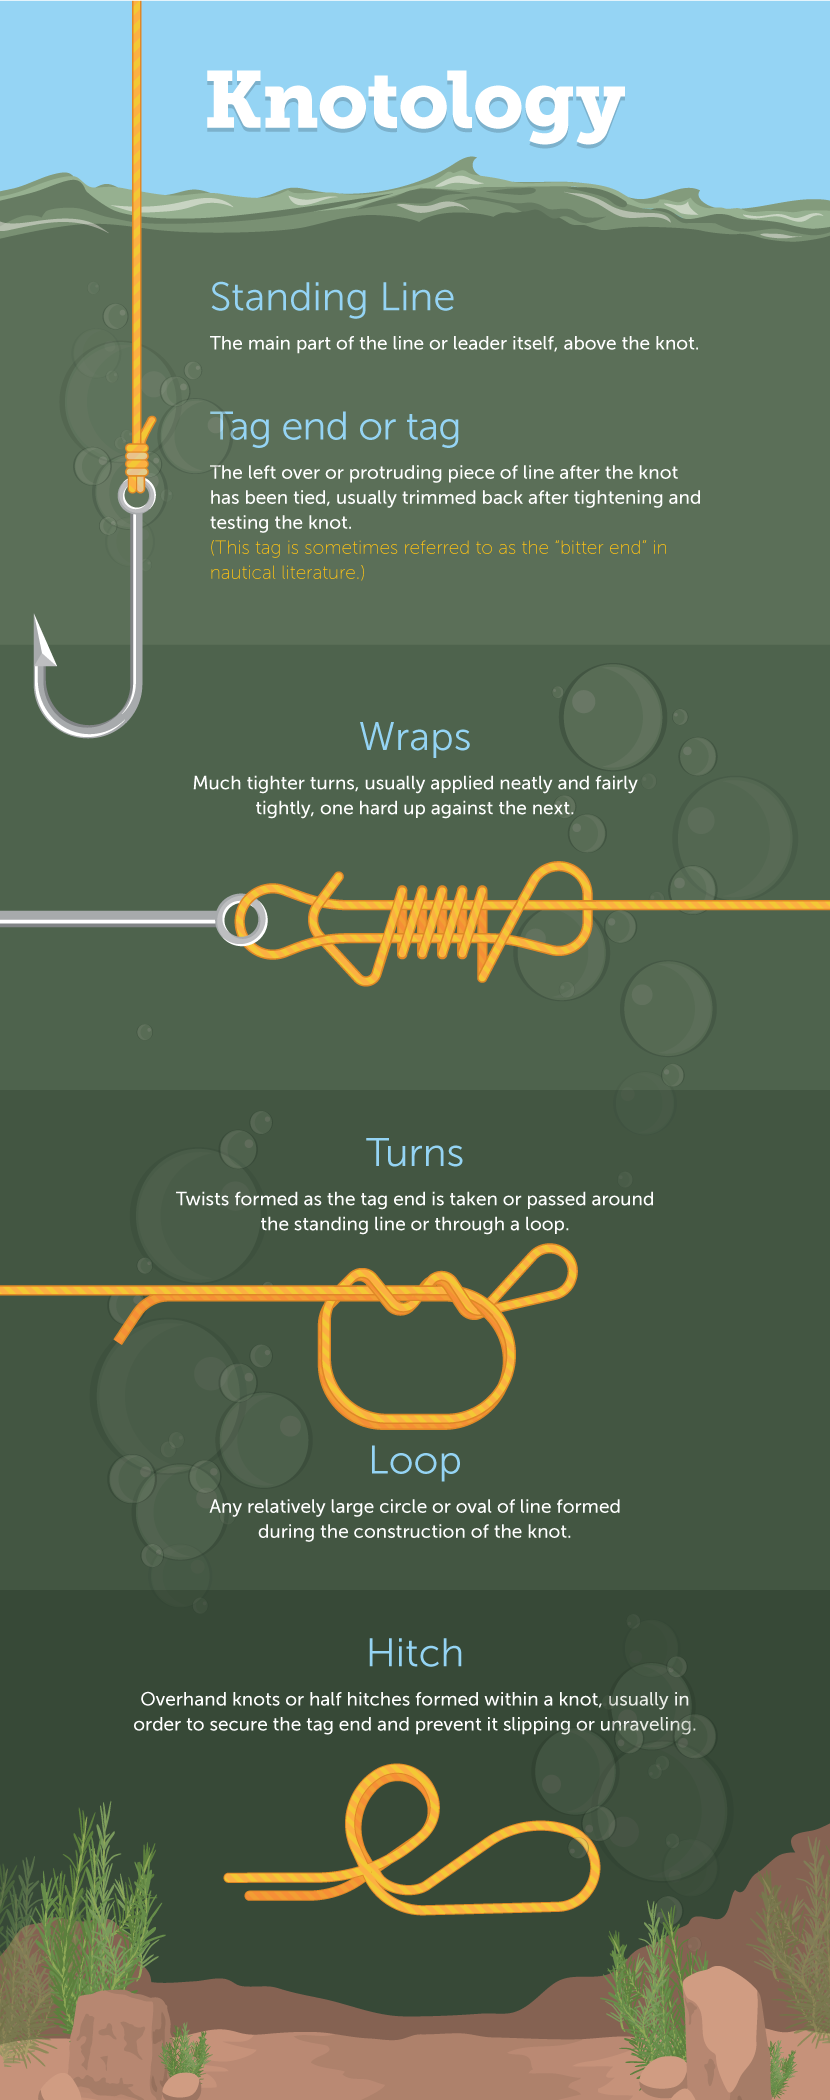
- Thread the line through the eye of the hook and leave about five to six inches of tag end.
- Wrap the tag end around the standing line five to seven times.
- Now, take the tag end and thread it back through the small loop near the hook eye.
- Finally, pull on the standing line to tighten the knot and clip any excess.
This knot works well in a variety of situations, especially when you’re using lighter tackle. It’s a go-to knot for many anglers due to its versatility.
Choosing the Right Knot
Deciding which knot to use often depends on the type of fishing you’re doing. For heavier lures and larger fish, the Palomar knot is your best bet. If you’re using lighter tackle, the Improved Clinch knot will serve you well.
Next time you head out, remember: the right knot can save your catch. Practice tying these knots before your trip, so you’re ready when that trophy fish bites!
Before you hit the water, it’s crucial to make sure your fishing rod setup is spot-on. A few final checks can save you from frustration later when you’re trying to reel in that big catch.
Final Checks and Adjustments
Now that you’ve assembled your fishing rod, it’s time for those last-minute inspections and tweaks. These steps will ensure that everything is working as it should, giving you the best chance at a successful fishing trip.
Start by inspecting your entire setup. Look for any loose components, such as the reel seat, guides, and line connections. A quick visual check can prevent any mishaps on the water. If something doesn’t look right, now’s the time to fix it.
Next, adjust the drag settings on your reel. The drag controls how much resistance a fish feels when it pulls on the line. If it’s set too tight, you risk snapping your line. If it’s too loose, you’ll lose control of the fish. A good rule of thumb is to set the drag to about one-third of the line’s breaking strength.
Finally, take a moment to test your setup before you head out. Give your rod a few gentle casts in your backyard or at a nearby park. This not only helps you get a feel for the rod but also allows you to check if the reel is functioning smoothly. You wouldn’t want to find out there’s an issue when you’re already on the water.
Imagine you’re standing by a beautiful lake, excited to fish, but then your reel starts acting up. That’s not the kind of story you want to tell! A little preparation can go a long way in making your fishing experience enjoyable.
Remember, taking these final steps to ensure your fishing rod setup is ready for use will set you up for success. It’s all about enjoying your time out there and catching some fish!