
How To Make Homemade Fishing Rod involves crafting your own fishing rod using accessible materials and tools, allowing for customization and personal satisfaction. This DIY approach not only saves money but also lets you tailor the rod to your specific fishing needs.
Imagine catching your favorite fish with a rod you’ve built yourself. It’s a rewarding experience, giving you a deeper connection to the sport and your gear.
When you’re gearing up to create your own fishing rod, the materials you choose can make a big difference. Each component contributes to the overall performance, durability, and feel of the rod.
Choosing the Right Materials
To successfully build a fishing rod, you need a mix of sturdy materials and essential hardware. From the main body to the small components, everything plays a role in crafting a rod that suits your fishing style.
First off, let’s talk about the rod blank. You can choose between two popular options: wood and fiberglass. Wooden rods, often made from species like ash or bamboo, offer a classic feel and flexibility. They can be a bit harder to work with, but many anglers enjoy the traditional craftsmanship involved. On the other hand, fiberglass rods are more durable and are generally easier to shape, making them a go-to for many DIYers.
Necessary Hardware
Once you’ve settled on the rod material, you’ll need the right hardware. This includes guides, which help control the line as you cast, and a reel seat to secure your fishing reel. Look for guides that are made from lightweight materials, like aluminum or ceramic, as these will enhance the rod’s performance.
Don’t forget about the reel seat! It should fit snugly to ensure stability while you’re fishing. High-quality reel seats are often made from graphite or aluminum, giving you the strength without the extra weight.
Adhesives and Finishes
Next, you’ll need some reliable adhesives and finishes to hold everything together. Epoxy resin is a popular choice for securing guides and attaching the reel seat. It’s strong and water-resistant, perfect for a fishing rod that will face the elements.
For the finish, consider using marine varnish or polyurethane. These products not only protect the wood or fiberglass but also enhance the rod’s appearance, giving it a nice glossy look. Just make sure to let each layer dry completely for the best results.
As you gather your materials, think about what style of fishing you enjoy most. For instance, if you love fly fishing, a lightweight fiberglass rod might be ideal. Tailoring your choices to your preferences can make all the difference in how your homemade fishing rod performs. Happy crafting!
Building your own fishing rod can be a rewarding project, but you’ll need the right tools to get started. Let’s break down the essential tools that will help you create a homemade fishing rod that you can be proud of.

Tools Required for Construction
Having the right tools at your disposal makes the process of building a fishing rod much smoother and more enjoyable. From cutting to assembly, each tool plays a crucial role in ensuring that your rod is functional and durable.
First up, you’ll need some cutting tools. A good saw or a sharp knife is essential for trimming the rod blank to your desired length. Depending on the material you choose, you might opt for a hacksaw for fiberglass or a utility knife for lighter materials. Just remember to make clean cuts for better results.
Next, measuring tools are a must-have. A standard ruler or measuring tape will help you get precise measurements for your rod. If you’re aiming for accuracy, consider using calipers to ensure that the rod sections fit together perfectly. Even a small miscalculation can affect your rod’s performance.
Finally, assembly tools will complete your toolkit. A drill is vital for making holes for guides and reel seats, while a wrench can help tighten any screws or fittings. You might also want some clamps to hold everything securely in place while you work.
Imagine you’re in your garage, surrounded by all these tools, excited to start your project. You’ve got your cutting tools ready, a measuring tape in hand, and your drill set up. With each step, you’re not just making a rod; you’re crafting a fishing companion that’s uniquely yours.
As you gather your tools, make sure to keep safety in mind. Always wear protective gear, especially when using cutting and drilling tools, to keep yourself safe while you enjoy the process of learning how to make a homemade fishing rod.
Building your own fishing rod can be a rewarding project that enhances your fishing experience. With a few materials and some patience, you can create a customized rod that suits your style. Let’s dive into the step-by-step construction process.

Step-by-Step Construction Process
This section will guide you through measuring and cutting the blank, attaching the guides and reel seat, and finally assembling and testing your homemade rod. Each step is straightforward, but focus and precision are key.
Measuring and Cutting the Blank: Start by selecting the right blank for your fishing needs. Measure out the desired length, typically between 6 to 8 feet for most freshwater fishing. Once you have your measurement, use a fine saw to cut the blank. Don’t rush this part; a clean cut ensures better performance.
For example, if you’re aiming for a lightweight rod for panfish, a 6-foot blank will do. But if you plan to chase larger species, consider opting for a longer, sturdier blank.
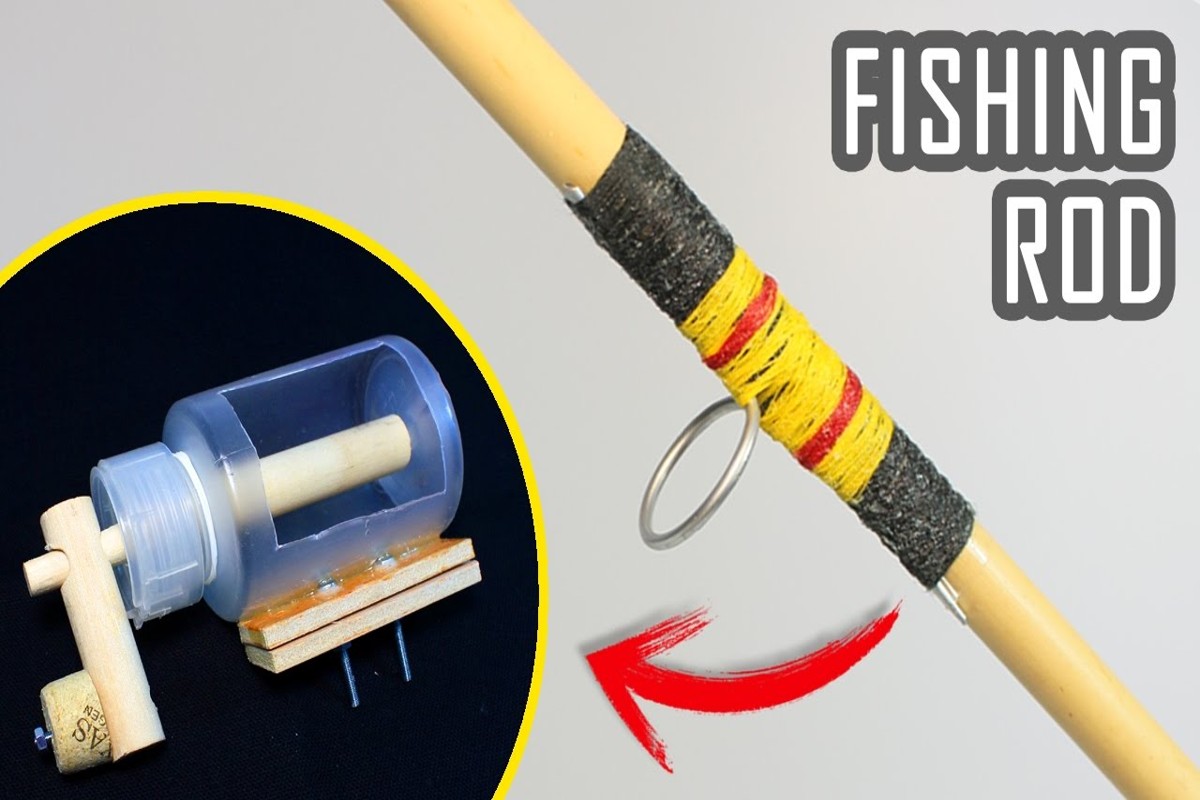
Attaching Guides and Reel Seat: Next, you’ll need to attach the guides and the reel seat. Start by marking where the guides will sit along the blank. Position them evenly spaced, usually about 12 inches apart, and secure them with a strong adhesive or rod wrapping thread.
For the reel seat, slide it onto the blank where you want your reel to sit. Ensure it’s snug and secure, as this will be crucial when reeling in your catch.
Final Assembly and Testing: After everything is in place, it’s time for final assembly. Wrap the guides with thread and apply epoxy to secure them. Let it cure fully before moving on. Once everything is dry, take your rod out for a test run.
Cast a few lines in your favorite fishing spot to see how it performs. Adjust any guides if needed and ensure everything feels right in your hands.
Building a fishing rod yourself can be a fun and fulfilling project. You not only save money, but you also gain a deeper appreciation for your gear. Plus, there’s nothing quite like landing a fish on a rod you crafted with your own hands!
Customizing your fishing rod can turn a standard setup into a personal masterpiece. This guide will help you explore different options to make your rod truly yours.

Customizing Your Fishing Rod
When it comes to creating your own fishing rod, personalization is key. The right rod length, action, and decorative touches can enhance your fishing experience and reflect your unique style.
First, let’s talk about rod length and action. The length of your rod can significantly affect your casting distance and accuracy. For instance, a longer rod (around 7 to 8 feet) is great for open water, while a shorter rod (around 5 to 6 feet) is perfect for tight spaces like rivers or streams. Action refers to how much the rod bends when pressure is applied. Fast action rods bend only at the tip, which is great for quick hook sets, while slow action rods bend more throughout their length, offering a softer feel for lighter lures.
Next up is the fun part: decorative wrapping techniques. You can use colorful threads to wrap the guides and create eye-catching patterns. Some people even choose to add personal touches, like initials or designs, making the rod a true reflection of their personality. For example, if you love fishing at sunset, you might opt for warm colors like orange and yellow to mimic that vibe.
Lastly, selecting color and finish options can make a big difference. You might choose a matte finish for a more understated look or glossy for something that really stands out. The color of the rod can also be tailored to your favorite hues or even match your fishing gear. Just think about what makes you excited to head out on the water!
As you customize your fishing rod, remember that the process is as enjoyable as the fishing itself. Take your time experimenting with different lengths, actions, and decorative elements to find the perfect combination that suits you best. Happy crafting!
Once you’ve crafted your homemade fishing rod, it’s crucial to test its quality before hitting the water. A proper testing routine ensures that your hard work pays off and that your rod performs well in real fishing scenarios.

Testing Your Homemade Fishing Rod
Testing your rod is just as important as building it. You want to ensure it can handle the pressure of fishing while being comfortable to use. Here are some essential tests to run.
First, you’ll want to perform weight tests. This involves applying pressure gradually to check the rod’s strength and flexibility. You can use weights or even try bending the rod gently to see how it responds. If it snaps or feels overly stiff, you might need to re-evaluate your materials or construction methods.
Next on the list is checking guide alignment. Misaligned guides can cause line twists and tangles, ruining your fishing experience. Lay the rod flat and visually inspect the guides. They should all line up perfectly. You can also run a fishing line through them to see if it moves smoothly. If there’s any snagging, consider adjusting the guides.
Finally, conduct casting trials. Take your rod to an open area, preferably near water. Bring a practice lure or weight and see how it casts. Pay attention to the distance and accuracy. If the cast feels awkward or heavy, it might indicate a balance issue or improper rod action. Adjustments can often be made to help improve your casting experience.
For instance, a friend of mine built a rod and was excited to take it out. During testing, he noticed it was difficult to cast long distances. After checking the guides and making a few adjustments, he found the right balance and was thrilled with the result!
Always remember, testing your homemade fishing rod isn’t just a formality; it’s a key step in ensuring you enjoy a successful fishing trip. Don’t skip this part, and you’ll thank yourself later!
Taking care of your homemade fishing rod is essential if you want it to last. Proper maintenance keeps your gear in top shape, ensuring a great fishing experience every time you head out. Here are some practical tips to help you maintain your rod like a pro.

Maintenance Tips for Longevity
Just like any other piece of equipment, your fishing rod requires regular care and attention. By following a few simple maintenance steps, you can extend its life and keep it performing well on the water.
First things first: cleaning your rod after each use is crucial. Saltwater and grime can corrode the materials, so give it a quick rinse with fresh water. Use a soft cloth to wipe down the guides and reel seat. This simple act can prevent long-term damage and keep everything functioning smoothly.
When it comes to storing your rod, think about where and how you keep it. Avoid leaning it against a wall or leaving it in your vehicle, as temperature fluctuations can warp the materials. Instead, use a rod rack or a protective case to keep it safe and secure. You wouldn’t want your rod to get tangled or bent, right?
Regular inspections are also key. Check for any signs of wear and tear, like cracks in the rod or frayed line guides. If you spot something, address it immediately. For example, if you notice a guide starting to peel, replace it before your next fishing trip to avoid any inconveniences.
Lastly, consider the environment where you fish. If you’re in a place with heavy vegetation or rocky terrain, you might want to inspect your rod even more frequently. The added stress from snagging can lead to unseen damage that could compromise your rod’s integrity.
With these simple maintenance tips, your homemade fishing rod will stay in great shape for years to come. Just a bit of care goes a long way, ensuring you have a reliable companion on all your fishing adventures.