
How To Line A Fishing Rod involves attaching a fishing line to the reel and threading it through the rod guides. This process is essential for effective fishing, ensuring your line is properly set for catching fish.
When you’re out on the water, having your fishing rod lined correctly can make all the difference. A well-lined rod not only improves your casting but also increases your chances of landing your target catch.
Choosing the right fishing line is crucial for your success on the water. The right line can make all the difference in your fishing experience, whether you’re going for bass in a local lake or trout in a mountain stream.

Choosing the Right Fishing Line
With so many options out there, picking the right fishing line can feel overwhelming. You need to consider the type of fishing you’ll be doing, the strength and diameter of the line, and what kind of fish you’re targeting.
First off, let’s talk about the main types of fishing lines: monofilament, fluorocarbon, and braided lines. Each type has its own strengths and weaknesses. Monofilament is great for beginners due to its versatility and ease of use. Fluorocarbon is almost invisible underwater, making it ideal for clear water fishing. Braided line offers incredible strength and sensitivity, perfect for heavy cover or big fish.
Next, consider the line strength and diameter. The strength of your line, often measured in pounds, should match the kind of fish you’re targeting. For example, if you’re aiming for larger species like pike or catfish, you’ll want a stronger line (like 20-30 lb test). On the other hand, if you’re fishing for panfish, a lighter line (around 4-6 lb test) will suffice and help you feel the bites better.
Best Line for Specific Fish Species
Choosing the right line also depends on the species you’re after. For bass fishing, a strong monofilament or braided line works well, giving you the power to pull them out of heavy cover. If you’re fishing for trout, a lighter fluorocarbon line is often preferred, as it blends into the water and doesn’t spook the fish. For saltwater species, like snapper or grouper, a braided line is usually the way to go due to its durability against tough conditions.
Remember, the right fishing line can enhance your experience and success rate. Take your time to choose wisely based on your specific fishing needs. You won’t regret it when you reel in that big catch!
Getting your fishing reel ready is crucial before you start lining your fishing rod. A well-prepared reel makes all the difference when you’re out on the water, ensuring a smooth experience. Let’s dive into how to properly prepare your fishing reel for line attachment.

Preparing the Fishing Reel
Before you can attach the line, you need to understand a few basics about your reel. Different types of reels have unique features that affect how you spool your line. Whether you have a spinning reel, baitcasting reel, or a fly reel, knowing your equipment will help you avoid common pitfalls.
First, let’s talk about the types of reels you’ll encounter. Spinning reels are great for beginners due to their ease of use. Baitcasting reels offer more control and precision for experienced anglers. Fly reels are designed specifically for fly fishing and require a different spooling technique. Understanding which type you have will guide you in correctly preparing it for your line.
Now that you know what reel you’re working with, it’s time to spool the line onto the reel. Start by placing the line spool on a flat surface. Make sure the line is coming off the spool in the same direction that it will wind onto the reel. This helps prevent line twist. For instance, if you’re using a spinning reel, the line should come off the top of the spool.
As you spool the line, apply some tension with your fingers. This will help the line sit evenly on the reel. If you notice any slack, it could lead to tangles and twists later. Keep an eye on how the line is layering; it should wind evenly without overlapping. If you find yourself in a jam, just stop and rewind a bit to fix any issues.
Preventing line twist and tangles is key to a hassle-free fishing trip. One effective method is to spool the line while holding the rod vertically. This allows gravity to help you keep the line straight. Also, don’t forget to check for any kinks or twists in the line itself before you start fishing. A little prevention goes a long way!
One practical tip is to practice spooling with a spare reel before you head out. This will build your confidence and ensure you’re ready for the real deal. The next time you think about how to line a fishing rod, remember that a well-prepared reel is your best friend on the water!
Attaching the fishing line to your reel is a crucial step in ensuring a successful day on the water. A secure connection means fewer frustrations when you’re trying to reel in that trophy catch.
Attaching the Line to the Reel
Understanding how to properly attach the line to your reel can make all the difference. With the right knot and technique, you’ll have a reliable setup that won’t let you down when it matters most.
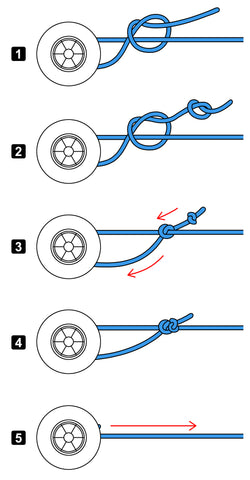
To start, you’ll want to use a strong knot for secure attachment. The two most popular knots for this purpose are the Palomar knot and the Arbor knot. Each has its own strengths and is suited for different types of reels.
Types of Knots
The Palomar knot is a favorite among anglers for its simplicity and strength. It’s easy to tie and works well with most lines. To tie it, double the line and feed it through the eye of the hook or lure. Then, make a simple knot and pass the loop back through the eye before tightening. You’ll find that this knot can withstand a lot of pressure.
On the other hand, the Arbor knot is perfect for securing your line to the reel spool. This knot is particularly useful for spinning and baitcasting reels. It involves creating a simple loop around the spool and tying an overhand knot to create a tight hold. When done correctly, it prevents the line from slipping when you cast.
Tips for Tight Connections
Regardless of the knot you choose, here are some tips to ensure a tight connection:
- Moisten the knot before tightening. This reduces friction and helps it secure better.
- Pull both ends of the line firmly to ensure the knot is tight.
- Trim any excess line close to the knot to avoid snags.
Picture this: You’re out on the water, and you hook into a big fish. Suddenly, you feel a snap, and your line goes slack. That’s the kind of moment you want to avoid by ensuring your line is properly attached to the reel. Take the time to tie those knots right, and you’ll set yourself up for success.
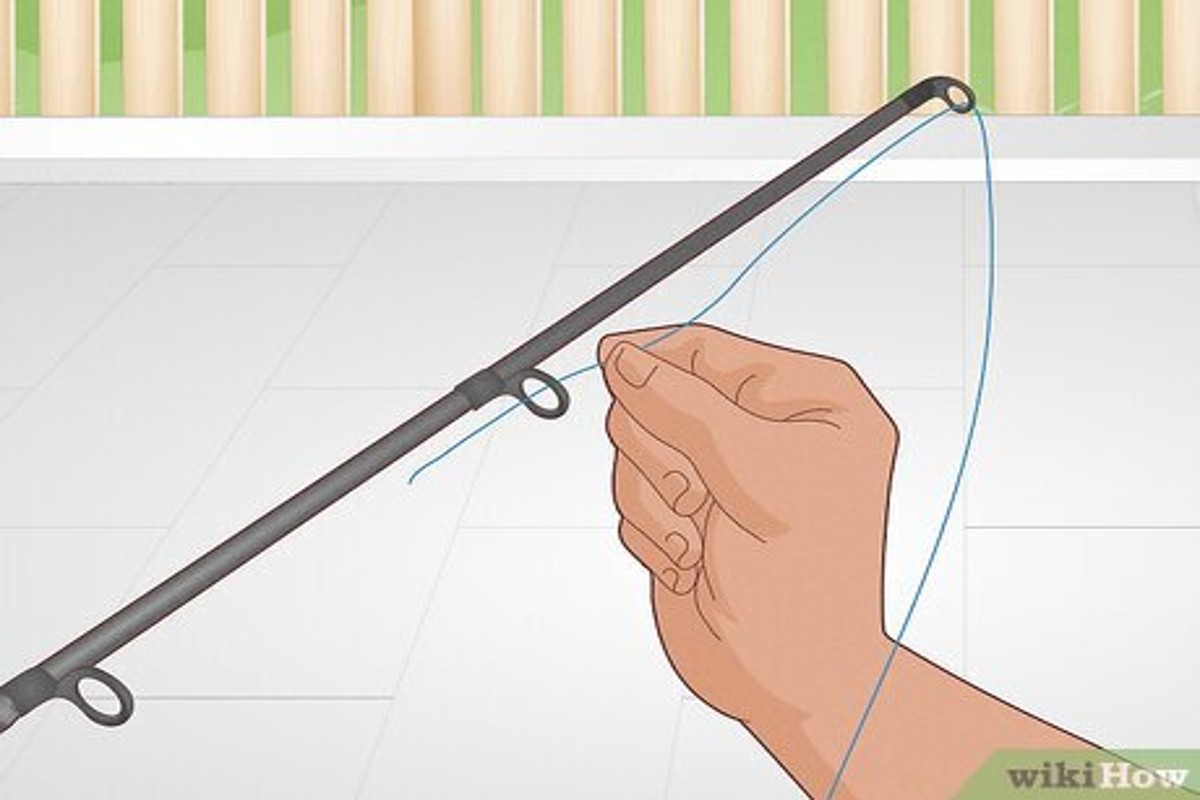
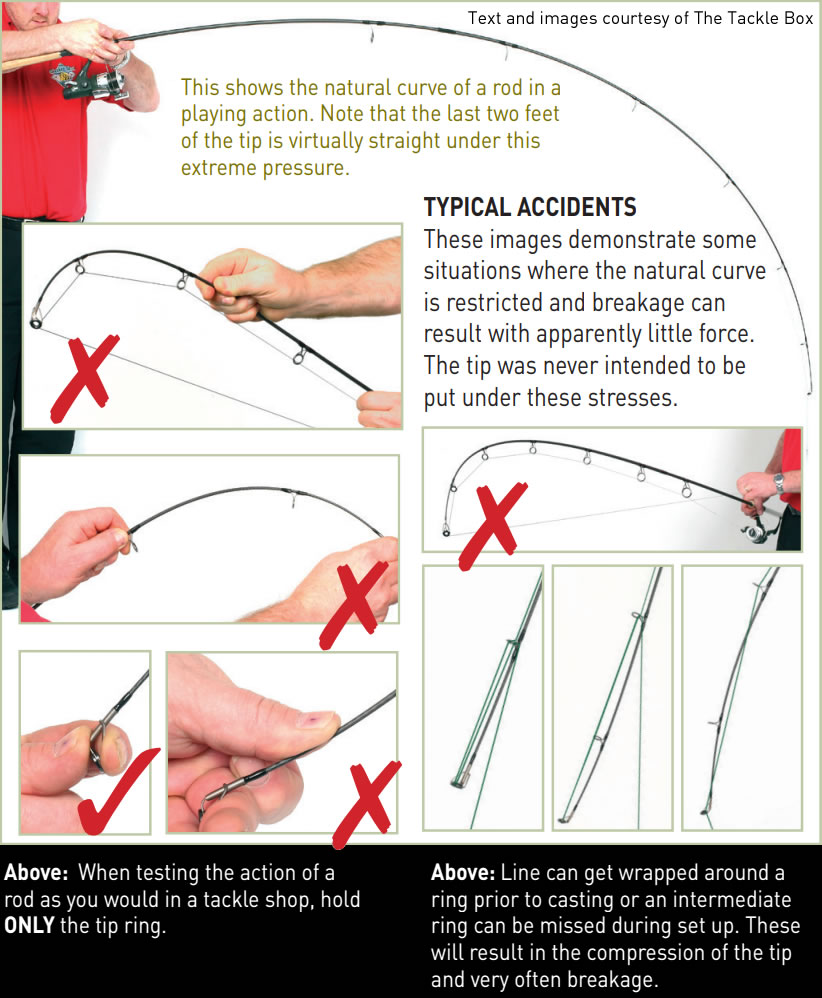
Threading the line through the rod guides is a crucial step in ensuring your fishing setup performs at its best. Getting it right can make a big difference in your fishing experience.
Threading the Line Through Rod Guides
To properly thread the line, you’ll want to start from the bottom guide and work your way up. This method helps reduce line twists and promotes a smooth, even distribution of line on your reel.
First, grab your fishing line and thread it through the bottom guide. Make sure you’re pulling the line through from the bottom to the top of the rod. This direction helps keep the line aligned correctly when casting.
As you move up to the next guides, be mindful of the line’s orientation. If the line twists as you thread it, you might end up with knots or tangles later. A good trick is to keep the spool on the ground and let the line come off the top. This way, it naturally unwinds without twisting.
When you reach the final guide, take a moment to check the line distribution. You want to ensure it’s evenly spread across the spool. Uneven distribution can lead to backlash, which can ruin your day on the water.
Let’s imagine you’re out fishing and suddenly your line snaps while casting. That’s usually due to poor threading or uneven distribution. By following these steps for how to line a fishing rod, you can avoid frustrating scenarios like that.
A practical tip: after threading, give the line a gentle tug to make sure everything’s secure. This little check can save you from losing that big catch later on!
When you’re out on the water, having your drag system set up correctly can make or break your fishing experience. A well-adjusted drag allows you to control the fight with the fish, making it easier to reel in your catch without losing it. Let’s dive into how to adjust your drag system for better fishing control.

Adjusting the Drag System
Understanding how to adjust your drag system is crucial for catching fish effectively. The drag system controls the amount of resistance a fish feels when it pulls on the line, which can prevent breakage while allowing you to tire out the fish.
First, you need to understand drag pressure. Drag pressure refers to the amount of force required to pull the line from the reel. If it’s too tight, you risk snapping your line when a fish makes a sudden move. If it’s too loose, the fish might get away. A good rule of thumb is to set your drag to about one-third of your line’s breaking strength. So, if you’re using 10-pound test line, set your drag to around 3-4 pounds.
Next, adjust the drag based on the type of fish you’re targeting. For instance, if you’re going after larger species like tarpon or marlin, you’ll want a tighter drag to handle their powerful runs. On the other hand, when fishing for smaller species like trout, a lighter drag might be more effective. Adjusting your drag according to the fish type ensures you have the right balance between control and safety.
Before you head out, it’s crucial to test your drag. This can be done by pulling on your line with a scale or simply by pulling it with your hands. Make sure it feels smooth and consistent. If you feel any jerks or sticking, it’s time to make adjustments. Testing your drag can save you a lot of headaches during your fishing trip.
For example, imagine you’re out on the lake, and you hook into a big bass. If your drag isn’t set properly, that fish could easily snap your line and swim away with your lure. But with a well-adjusted drag, you can tire it out and bring it in without losing your catch.
Always remember, adjusting the drag system is an ongoing process. You might need to tweak it as conditions change or if you switch to different species. Pay attention to your setup and adjust accordingly for a smoother fishing experience.
Once you’ve lined your fishing rod, the work doesn’t stop there. Performing final checks and regular maintenance will ensure your gear remains in top shape for your next fishing adventure.
Final Checks and Maintenance Tips
Before you head out, it’s crucial to inspect your line and take care of your rod. This will not only improve your experience but also extend the lifespan of your equipment.
Start by inspecting your fishing line for any signs of wear. Look for frays, nicks, or discoloration that could indicate it’s time for a replacement. A worn line can lead to missed catches or even breakage, so don’t skip this step.
Regular maintenance practices can make a huge difference. After each fishing trip, rinse your rod with fresh water to remove dirt and salt. This simple act can prevent corrosion and prolong the life of your gear. Also, check the reel for any debris and lubricate it if necessary.
How you store your rod can affect its performance too. Keep it in a cool, dry place, away from direct sunlight. A soft rod sock or case can protect it from scratches and dust. If you’re using a multi-piece rod, make sure to disassemble it properly to avoid any damage.
Imagine you’re about to reel in a big catch, but your line snaps because it was worn out. That’s the kind of moment you want to avoid! Regular checks and proper maintenance can save you from frustration on the water.
Remember, taking the time for these final checks and maintenance will pay off when you’re out fishing. A little effort goes a long way in ensuring your rod is always ready for action.