
How To Make Fishing Rod In easy steps involves selecting materials, assembling the components, and ensuring proper functionality. Crafting your own fishing rod can enhance your fishing experience and save money.
Imagine being able to customize your rod to suit your fishing style and needs. With just a few materials and some simple techniques, you can create a reliable tool for your next fishing trip.
When you’re ready to tackle the project of making your own fishing rod, selecting the right materials is crucial. The quality of your rod will depend largely on what you choose, so let’s break it down.

Choosing the Right Materials for Your Fishing Rod
Building a fishing rod isn’t just about assembling parts; it’s about picking the right components that work together harmoniously. Each material plays a role in the rod’s performance, flexibility, and durability.
First up, let’s talk about the fishing rod blanks. These are the core of your rod, and they come in a variety of materials such as fiberglass, graphite, and composite. Fiberglass rods are generally more durable and ideal for beginners, while graphite rods are lighter and more sensitive, perfect for experienced anglers. Composite rods blend the best of both worlds but can be pricier.
Choosing the Right Guides
The guides on your rod are where the fishing line runs through, and they can significantly affect casting distance and accuracy. You’ll want to consider materials like aluminum oxide or ceramic for their smooth finish. These materials reduce friction, allowing the line to glide effortlessly. Make sure to choose guides that match the type of fishing you plan to do; for instance, heavier guides are useful for saltwater fishing, whereas lighter ones work well in freshwater.
Selecting a Suitable Reel Seat
The reel seat is where your fishing reel attaches to the rod, and it needs to be robust enough to handle the stress of reeling in a catch. Look for seats made from materials like graphite or aluminum, as they’re lightweight yet strong. You want to ensure that the reel seat can accommodate your chosen reel securely without any wobble.
As a practical tip, consider visiting a local tackle shop to feel the materials firsthand. Sometimes, getting a sense of how a rod feels in your hands can make a huge difference in your choice. Remember, how you build your rod can change your fishing experience, so take your time selecting the right materials for your project on how to make fishing rod in five easy steps.
Crafting your own fishing rod can be an exciting and rewarding experience. To get started, you’ll need a variety of tools to ensure that your rod is not only functional but also meets your specific fishing needs.

Tools Required for Crafting a Fishing Rod
When you’re ready to dive into the process of making a fishing rod, having the right tools on hand is crucial. This section breaks down the essential tools you’ll need, along with some optional tools for advanced techniques and safety equipment you should consider.
First up, let’s cover the essential tools. You’ll need a sturdy rod blank, which is the core of your fishing rod. A good pair of cutting tools, like wire cutters, will help you trim your materials to size. Additionally, a wrapping tool is essential for attaching guides and other components securely to your rod.
Essential Tools
- Rod blank – the main body of your fishing rod
- Wire cutters – for precise cuts
- Wrapping tool – for securing guides
- Epoxy – to bond components
- Sandpaper – for smoothing out rough edges
Now, if you’re looking to take your rod-making skills up a notch, consider adding some optional tools to your kit. A heat gun can help shrink tubing and secure reel seats. A lathe is fantastic for shaping cork grips if you want to customize the handle. These tools can make your rod not just functional but also a masterpiece.
Optional Tools for Advanced Techniques
- Heat gun – for heat-shrink tubing
- Lathe – for custom grip shaping
- Rod turner – for even epoxy application
Safety should never take a backseat when you’re working with tools. Make sure to wear safety glasses to protect your eyes from flying debris, especially when cutting or sanding materials. A good pair of gloves can also keep your hands safe from sharp edges and hot surfaces.
Safety Equipment to Consider
- Safety glasses – to protect your eyes
- Gloves – to protect your hands
- Dust mask – for sanding or cutting materials
Before you start, double-check that you have all the necessary tools laid out. This will not only speed up your process but also help you avoid frustration. Happy rod crafting!
Assembling your own fishing rod can be a fun and rewarding project. It’s a straightforward process that gives you a sense of satisfaction once you complete it. Let’s dive into the steps you need to follow to get your rod ready for your next fishing adventure.
Step-by-Step Guide to Assembling Your Fishing Rod
In this section, you’ll learn how to attach the reel seat, install the guides, and thread the line. Each of these steps is crucial for ensuring your fishing rod works effectively and lasts for years to come.
First, let’s tackle the reel seat. This part is where your fishing reel will sit securely. Start by sliding the reel seat onto the butt end of the rod. Make sure it’s positioned comfortably for your grip. You’ll want to use a strong adhesive or epoxy to secure it in place. Let it dry completely before moving on, as this will prevent any wobbling later on.
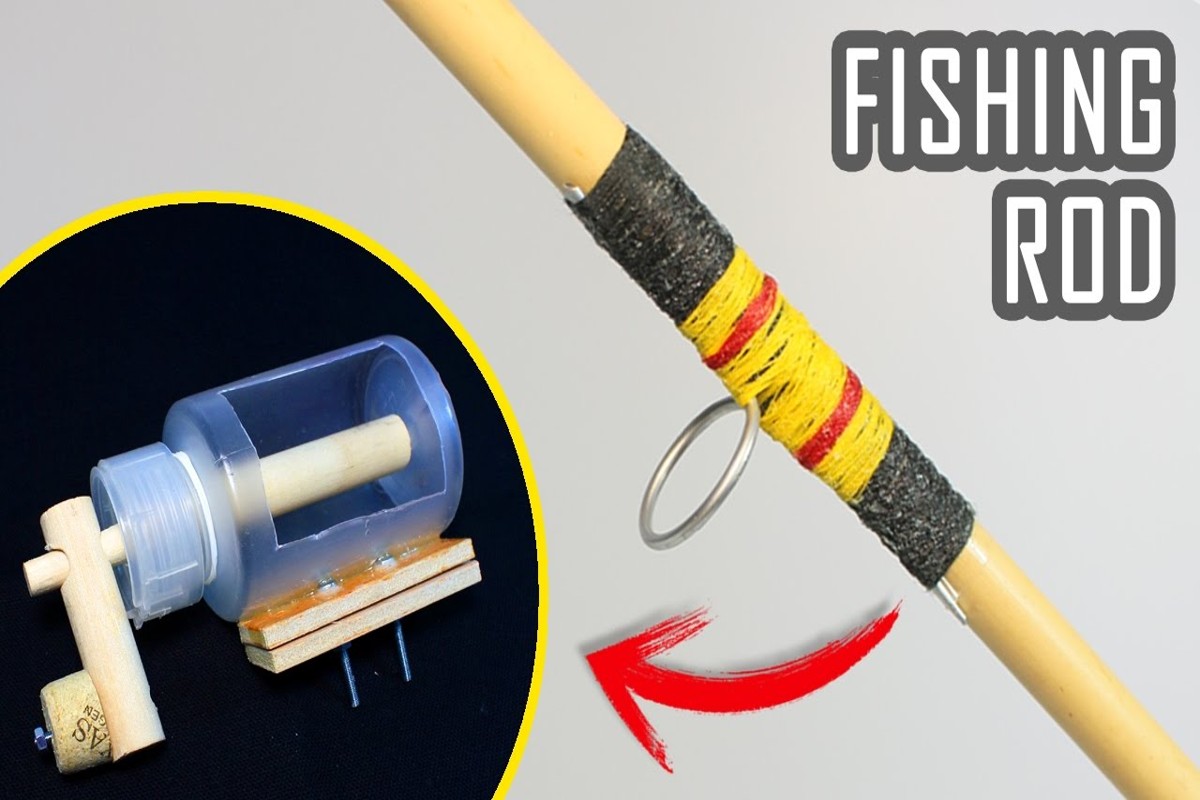
Next up is installing the guides. These small rings help the fishing line run smoothly along the rod. Begin by deciding how many guides you’ll need based on the length of your rod. Typically, you’ll want at least 5-6 guides for a standard rod. Space them evenly along the blank. Use a strong thread to wrap around each guide base, and then apply some adhesive to hold them securely. It’s like giving your rod a little bit of bling!
Now it’s time to thread the line. Start by tying the line to the reel’s spool, making sure it’s tight. Run the line through each guide, moving from the reel towards the tip of the rod. This step is crucial for ensuring the line doesn’t snag or tangle while you’re fishing. Once you reach the tip, make sure to leave some extra line for casting.
Remember, patience is key when assembling your fishing rod. If you rush, you might overlook important details. A well-assembled rod can make a world of difference on your fishing trip. Picture this: you’re out on the lake, casting your line effortlessly, and feeling proud that you built your rod from scratch. That’s the joy of DIY!
Once you’ve assembled your fishing rod, it’s time to add some personal flair. Customizing your rod not only makes it uniquely yours but can also enhance your fishing experience. Let’s explore how to make your fishing rod stand out.

Finishing Touches: Customizing Your Fishing Rod
Personalizing your fishing rod can reflect your style and preferences. From choosing colors to adding grips, these finishing touches can make a significant difference in both aesthetics and functionality.
First up, let’s talk about colors and patterns. You can choose from a wide range of paint options, or even wrap your rod with colorful threads for a unique look. If you’re a fan of camo, you might want to go for a camouflage pattern. Picture yourself on the water with a rod that not only catches fish but also turns heads!
Next, think about adding grips and decals. Comfortable grips can enhance your handling, especially during those long days on the water. You can find grips made from various materials, including foam and rubber, which provide both comfort and durability. Don’t forget decals! They can be fun, like fish designs or even your name, making your rod truly yours.
Finally, consider applying protective coatings. These coatings can shield your rod from the elements, helping it last longer. A clear coat or specific rod finish can provide that extra layer of protection without compromising its look. Just make sure to follow the manufacturer’s instructions for best results.
As you customize your rod, remember that it’s all about what makes you happy. Pick colors and designs that resonate with you, and don’t shy away from experimenting. The more you personalize your fishing rod, the more you’ll enjoy your time on the water. Happy fishing!
Once you’ve crafted your fishing rod, it’s time to put it to the test. You want to ensure it performs well before you head out to your favorite fishing spot.
Testing Your Fishing Rod for Performance
Testing your fishing rod is crucial to ensure it functions as intended. You’ll want to check for basic performance, make any necessary adjustments, and identify common issues that could affect your fishing experience.
Start with some basic performance tests. First, check the rod’s flexibility and strength. Hold the rod and gently bend it to see how it responds. A good rod should have a nice curve without feeling too stiff or too flimsy. Next, attach a reel and line, then simulate casting to see how it handles. You want a smooth action that feels comfortable in your hands.
Adjustments can make a big difference in performance. If your rod feels unbalanced or too heavy, consider changing the reel or repositioning the line guides. Sometimes, simply adjusting the drag on your reel can enhance your casting distance and accuracy. Don’t hesitate to tweak what you’ve built to achieve the best feel for your style.
Common issues can sneak up on you during your testing. Look for any signs of wear, such as frayed line guides or loose components. Pay attention to the rod’s action; if it feels inconsistent, that could indicate a problem. Also, listen for any unusual sounds when bending the rod—cracking or popping could mean it’s not safe to use.
Imagine you’re out on a serene lake, excited to cast your line. Suddenly, your rod snaps or the reel jams. That’s not the experience you want! Regularly testing your rod ensures that you can enjoy fishing without unexpected surprises. Make it a habit to check your gear before each trip, and you’ll be set for a great day on the water.
Taking care of your fishing rod is crucial if you want it to last. A little maintenance goes a long way in ensuring that you keep reeling in those big catches. Here’s how to maintain your fishing rod for years of successful fishing trips.

Maintenance Tips for Longevity of Your Fishing Rod
Regular maintenance can significantly extend the life of your fishing rod. By following a few simple steps, you can keep your rod in top shape, ready for your next adventure.
First and foremost, cleaning your rod after each use is essential. Saltwater, dirt, and grime can accumulate and cause damage over time. Just a quick rinse with fresh water followed by drying it with a soft cloth will do wonders. You don’t want those salty residues ruining your gear.
Next, think about proper storage techniques. Storing your fishing rod vertically is one of the best ways to prevent it from bending or breaking. If you can, keep it in a rod holder or a protective case. Avoid leaving it in a hot car or exposed to direct sunlight for long periods; both can weaken the materials.
Routine inspections are another key aspect of maintenance. Take a few minutes to check for any signs of wear and tear, like frayed lines or cracked guides. If you spot anything unusual, don’t hesitate to make repairs. For instance, replacing a broken guide is much easier than dealing with a damaged rod later on.
Lastly, consider a good cleaning routine before and after each fishing season. Use a gentle soap and water solution to clean the rod and reels, ensuring you remove all dirt and salt. This not only keeps your rod looking good but also helps you spot any potential issues early.
By implementing these maintenance tips, you’ll ensure your fishing rod stays in prime condition, ready for whatever the water throws at you. Remember, a well-cared-for rod is key to a successful fishing experience.