

How To Put Fishing Line On A Rod And Reel is a crucial skill for any angler. It involves threading the line through the guides and spooling it onto the reel, ensuring effective fishing performance.
Whether you’re preparing for a weekend trip or just out for some leisure fishing, knowing how to do this correctly can make all the difference. A well-spooled line minimizes tangles and enhances your casting, so it’s worth mastering.
Choosing the right fishing line is crucial for your success on the water. With various types available, each has its strengths and best uses. Understanding these differences can help you select the perfect line for your next fishing adventure.
Choosing the Right Fishing Line
There are three main types of fishing lines: monofilament, braided, and fluorocarbon. Each type has unique characteristics that make it suitable for specific fishing situations, so let’s break them down.
Monofilament: This is the traditional choice for many anglers. It’s easy to handle, flexible, and floats well. Monofilament is great for beginners because it has some stretch, which can help absorb shock when fighting a fish. However, it can be more visible in the water, making it less ideal for clear conditions.
Braided: Braided line is known for its incredible strength-to-diameter ratio. It’s much thinner than monofilament and offers no stretch, providing excellent sensitivity for detecting bites. This makes it ideal for heavy cover or deep-water fishing. Just keep in mind that it can be more visible to fish in clear waters.
Fluorocarbon: This line is nearly invisible underwater, making it perfect for wary fish. It sinks faster than monofilament, which can help you get your bait down quickly. Fluorocarbon is also less prone to abrasion, making it a good choice for rocky or rough environments. However, it can be stiffer and less manageable than the other two types.
Choosing Line Strength
Line strength is measured in pounds, which indicates how much weight the line can handle before breaking. You’ll want to match the line strength to the type of fish you’re targeting. For instance, if you’re going after bass, a 10-15 lb test might suffice. But for larger species like pike or muskie, you might need a stronger line, around 30-50 lbs.
Considerations for Fishing Conditions
Think about where you’ll be fishing. If you’re in heavy cover like weeds or rocks, a braided line with a higher test is a great choice due to its abrasion resistance. If you’re fishing in clear water, opt for fluorocarbon to avoid spooking fish. And for general freshwater fishing, monofilament often does the trick.
When selecting a fishing line, consider your fishing style, the conditions, and the species you’re targeting. For instance, if you’re fly fishing in a clear stream, a light fluorocarbon line could make all the difference. Armed with this knowledge, you’ll be better prepared for how to put fishing line on a rod and reel effectively.
Before you start spooling your fishing line, you’ll need to gather a few essential tools and supplies. Having everything at hand will make the process smoother and more efficient.
Gathering Necessary Tools and Supplies
When it comes to spooling fishing line, the right tools can make all the difference. You’ll need a quality fishing line, a rod and reel, and a pair of scissors or a line cutter to get started.
Fishing Line: Choose the type of fishing line that suits your needs, whether it’s monofilament, fluorocarbon, or braided. Each type has its own strengths and weaknesses, so consider where you’ll be fishing and what kind of fish you’re targeting.
Rod and Reel: Make sure you have the correct rod and reel combo for the line you’re using. Compatibility is key; a mismatched setup can lead to frustrating tangles and poor performance on the water.
Scissors or Line Cutter: A good pair of scissors or a dedicated line cutter will help you trim the line to the desired length. You’ll want a clean cut to prevent fraying, which can lead to weak spots in the line.
Picture this: you’re out on the lake, the sun is shining, and you just caught a glimpse of a big fish. You reach for your rod, but the line’s tangled because you didn’t have the right tools when you set it up. Avoid that scenario by prepping your gear properly!
Once you have these tools gathered, you’ll be ready to learn how to put fishing line on a rod and reel effectively. Each step builds on the last, so having everything at your fingertips makes the process much easier.
Before you start spooling your fishing line, it’s crucial to prepare your rod and reel properly. A few simple steps can save you time and frustration later on.

Preparing the Rod and Reel
Getting your rod and reel ready is the first step in the process of learning how to put fishing line on a rod and reel. By following these steps, you’ll ensure a smooth setup and a better fishing experience.
Start by checking the reel’s spool. Make sure it’s clean and free from any old line or debris. A cluttered spool can lead to tangles and frustrating casts. If you find any remnants of old line, take a moment to remove them before proceeding.
Next, attach the reel to the rod. Align the reel seat with the reel foot and tighten it securely. This step is crucial, as a loose reel can lead to poor performance while you’re out on the water. Always double-check that it’s snug.
Finally, ensure that the drag is loosened. This will allow the line to unwind smoothly as you spool it onto the reel. A tight drag during this step can create unnecessary tension, causing the line to twist or knot. Just remember, a little looseness goes a long way!
As you prepare your equipment, think of it like tuning up a bike before a ride. You wouldn’t want to hit the road with a wobbly wheel, right? Taking these preparation steps will help you enjoy your fishing trip with fewer hassles.
Spooling fishing line on your rod and reel might seem tricky at first, but it’s a straightforward process once you get the hang of it. Follow these simple steps, and you’ll be ready to hit the water in no time.
Spooling the Fishing Line
Getting the line onto your reel correctly is crucial for a smooth fishing experience. A well-spooled line helps prevent tangles and improves casting distance.
First, thread the line through the guides on your rod. Start from the tip and work your way down to the reel. This ensures that the line flows smoothly and reduces the risk of snags while you’re fishing.
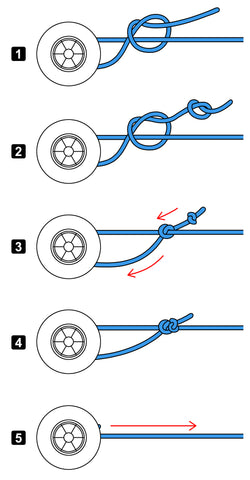
Next, attach the line to the spool. Most reels have a slot or a hole where you can feed the line through. Once it’s through, tie an arbor knot to secure it. Make sure the knot is tight—this will prevent the line from slipping off when you cast.
Now, it’s time to wind the line evenly onto the spool. Hold the reel in one hand and gently apply tension to the line with the other while turning the handle. This ensures that the line lays flat and doesn’t bunch up. If you see it piling on one side, stop and adjust. An even line will help you cast better and reduce the chances of tangles.
As an example, let’s say you’re spooling a new spinning reel for bass fishing. You’ll want to make sure you have enough line for long casts, but not so much that it overflows. Aim for a full spool, but leave about an eighth of an inch from the edge. This way, you won’t run into problems when you’re out on the lake.
For a smooth experience, consider using a line spooler if you’re struggling with the manual method. It can greatly reduce the hassle and ensure a tighter wrap. Remember, taking your time during this process pays off—an improperly spooled line can lead to frustrating moments on the water.
Getting the right tension and length on your fishing line is crucial for a successful day on the water. Too loose, and you risk losing your catch; too tight, and you might snap the line. Let’s dive into how to adjust these factors effectively.

Adjusting Line Tension and Length
Proper line tension and length ensure that your bait behaves naturally, increasing your chances of a bite. Adjusting these settings involves a few simple steps, but they can make a big difference in your fishing experience.
First, you’ll want to adjust the drag settings on your reel. The drag controls how much resistance a fish feels when it pulls on the line. If it’s set too tight, you risk breaking the line. If it’s too loose, the fish might swim away with your bait. A good rule of thumb is to set your drag to about 25% of the line’s breaking strength. This way, you’ll have enough give to handle a fight without losing your tackle.
Next, check for any line twist. Line twist can occur during spooling or when casting and retrieving. If your line is twisted, it won’t lay properly on the reel, which can affect your casting distance and accuracy. To check for twist, simply let out some line and watch for any coils. If you notice twists, you can either manually untwist it or wind the line back onto the reel in the opposite direction to correct it.
Finally, don’t forget to trim any excess line. After spooling, you may find that you’ve got a little too much line on your reel. This can lead to tangles and poor casting performance. Use scissors or a line cutter to trim the line, leaving about 1/8 inch above the spool. This small adjustment can save you from a frustrating mess later on.
As you get more comfortable with how to put fishing line on a rod and reel, you’ll develop your own preferences for tension and length. Remember, a well-adjusted line can make all the difference between a perfect catch and a frustrating day. Happy fishing!
After you’ve gone through the process of putting fishing line on your rod and reel, the final checks and maintenance are crucial. These steps ensure that your gear is ready for your next fishing adventure and will prolong its life.
Final Checks and Maintenance Tips
Taking a moment to inspect your line and gear can save you from frustrating moments out on the water. Regular maintenance checks will keep everything in top shape.
First, always inspect your fishing line for any knots or tangles. Knots can weaken your line and lead to frustrating breaks when you hook a big one. If you spot any, take the time to untangle or replace the affected sections. You wouldn’t want your trophy catch slipping away because of a simple oversight!
Next, proper storage of your rod is essential. When not in use, keep it in a protective case or on a rod rack to avoid damage. This will help prevent unnecessary bending and breakage. Make sure it’s stored in a cool, dry place away from direct sunlight, which can weaken both the line and the rod materials over time.
Lastly, regular maintenance checks are a must. Inspect the reel for any signs of wear and tear, such as rust or grime buildup. Clean your reel after each use, particularly if you’ve been fishing in saltwater. A little maintenance goes a long way in ensuring your gear performs at its best, season after season.
By keeping an eye on these details, you’ll be primed for successful fishing trips. Remember, a well-maintained rod and reel not only enhances your experience but also increases your chances of landing that big catch. Happy fishing!